<-CLICK HERE FOR SCOOBY TECH. POSTS ONLY! CLICK HERE FOR GRAN TURISMO POSTS ONLY!->
1998 Impreza Turbo Project Car + Expanding WRX Knowledge Base!

Sunday, 30 January 2011

Selling the Scoob!

There's so much stuff I still want to do with the car - relocate the aerial to the roof and fit a shark-fin, bigger brakes, STi intercooler etc, + finish my damn carbon wind-diffuser - but the running problems that have started to develop, as well as the general running costs, have led me to the decision of selling the one and only Scoob. :(

I've been looking at diesel BMWs for a while now and eventually bought a W-reg 530d, which I'm now mainly using. Although I could afford to keep the Impreza if I took it off the road, I'm worried that if I keep it garaged somewhere the project will fall by the wayside and there just isn't space at home. My work doesn't help either - they've got me doing 6 days a week now and I'm struggling to fit everything into Sunday alone. The final straw came with fitting the PAS-pump, when family arrived and I spent the entirety of their visit fiddling with the Scoob. I know this level of commitment is required in a proper project, but I don't feel like I'm moving forward with the car any more. The last few frugal months have still been spent on repairing the car's faults, not saving for the next big mod and it seems this is set to continue until summer when it's MOT time - and who knows what else they might find wrong with her. All my modding inspiration is being postponed indefinitely and to be honest this has killed my enthusiasm.

To summarise the faults:

The £65 PAS-pump did not cure the steering whine so thats obviously the rack itself which are £100 for the cheapest used one and hellish to fit. It also didn't fix the ticking noise so that could now be anything - the water-pump, oil-pump, alternator, cam-belt or cam-pulleys etc...

The engine is still losing coolant after fitting the new radiator. It needs topping up every few weeks by a litre or two, although it's never since overheated.

The boot leaks. I've tightened the LED-lights in as much as possible and taped up around various places, but there is still water getting in, which pools in the spare-wheel well after a rainy few days. During the day the condensation from it fills the rear windscreen and windows. Worst of all, my amp and subs are often running with condensation and the carpet was full of ice over Xmas. Limp.

There's a knock from the front suspension, maybe a trailing arm, which can be heard when cornering over a bump at low speed or up a slope.

There is a squeaking noise coming from the n/s rear wheel. I would hope its just a sticky brake, but it could be a wheel bearing. :(

So the car is going on eBay. I've written a nice spiel for the advert [which leans mainly to the cars positives I'll be honest] and I'm starting the bidding at £1000, with a buyout price of £1500. Not bad I reckon just for the value of the parts on her, but the average 100k Scoob isn't going for much more than a grand and mine has just rolled onto 141k so we'll see how it sells.

Saturday, 29 January 2011

Saturday, 22 January 2011

Steering whine and ticking noise - not fixed!

The power-steering has always had a loud whine when turning at low-speeds, but it's safe to say this has worsened over the summer, where I could hear it while turning at higher speeds - roundabouts and stuff - and the after the snowy weather the whine can be heard turning in either direction most of the time. A ticking noise has also developed under the bonnet that seems to be coming from the front of the engine.

After much deliberation we decided it must be the power-steering pump on its way out with the ticking coming from its pulley. My friends had even begun to comment on the noises so I went ahead and bought the pump along with a new auxiliary-belt and spent a Sunday fitting them. The used pump I bought was definitely newer and in far better condition than mine, but if anything this made the problem worse. As soon as I fired her up the ticking noise was back and the whine could now be heard on tickover. I revved the engine and the whine went with it like a supercharger.

I can now only guess that the whining noise is coming from the steering-rack itself, which are expensive new. I can find used ones for about £100, but they are hellishly complex to fit. The ticking noise is worse, as it could be anything - the alternator-pulley, crank-pulley, oil-pump, water-pump, even the timing belt or cam-pulleys. Unless I book the car in with a pricey specialist I may never find the culprit - and I can't replace every part on the engine.

On top of this, I'm still having to top the engine up with coolant. It's such a shame that its still losing some over several weeks and there are still no signs of a blown head-gasket, so that may very well be the water-pump too. The coolant could be ending up in the boot however, but I suspect its probably just a leak. I have taped up around the rear-lights and tightened them as far as they will go into their recess over the last few months, but it seems they are determined to keep on letting in water. My subs and amp are often running with condensation and the carpet on the sub-box had ice all over it round xmas.

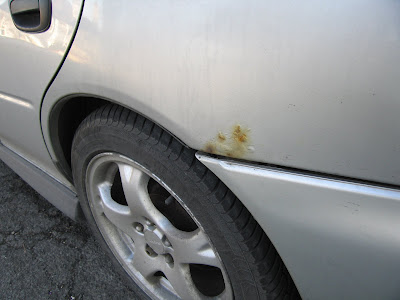
To top this little lot, I neglected to finish off painting the rear wheel-arches so rust has begun to creep back on both of them and they need redoing. It strikes me that as the weather gets nicer again, the forthcoming six months are going to have to be spent on a load more repair work, rather than getting back on the mods like I desperately want to. I was hoping to get the front TEINs on, fit bigger brakes, an STi intercooler to safely up power and then concentrate on the repairs come MOT time in June, but these problems won't wait and there could be a ton more on the test.

Its a crying shame, but I've decided to quit while Im ahead and move the car on to someone who will spend time on taking it to the next level, or just wrap my pride and joy round the nearest tree. I'll be listing the car on eBay shortly and we'll see what it makes. There is also a new BMW in the pipeline...

Saturday, 15 January 2011

Replacing the PAS-Pump

I wouldn't say this was a very advanced job, but it does get fiddly working in the confined spaces so the instructions are quite detailed. Also be prepared to contort your arms into horrible positions and make sure you have a socket-set with at least 5 inches of extra reach AS WELL as a 12mm and 14mm open-ended spanner, with as low a profile as possible.

PROCESS:

1. Slide the finger-clip down the rubber-hose that enters the top of the PAS-pump. Slide the hose off the metal-pipe on the pump and plug the end of the hose.

2. Remove the two bolts holding the pulley-cover in place using a 10mm wrench, then loosen the bolt on the right-side alternator bracket using a 12mm wrench a couple of turns so the pulley-cover can be slid out. Turn the pulley-cover over and push the plastic-stud that holds the throttle-cable clip out of its hole.

3. Using a 12mm open-ended spanner, loosen the far nut on the throttle-cable where it sits in the bracket as far as it will go so the cable can be pushed back and lifted out of the bracket. Swivel the cable so it clears the PAS-pump area and fasten it with a cable-tie.

4. Using a 14mm open-ended spanner, loosen the union-bolt that attaches the metal-pipe to the port on the left side of the PAS-pump. Only crack the bolt off a couple of turns so no fluid spills, but the bolt can be removed easily once the pump is no longer fixed in position.


5. Remove the bolt that is threaded through the long adjusting-bolt that moves the alternator up and down. There is no need to slacken the adjusting-bolt - once the holding-bolt is out, the alternator should drop down fully anyway.

6. Lower the alternator until the belt becomes loose enough to be slid off the pulleys.

7. Remove the 3 bolts holding the PAS-pump in place using a 12mm wrench. There are 2 bolts to the front of the pump, beneath the pulley, which are easy to find, but there isn't a lot of room to turn them. The third, to the rear-right of the pump can be accessed from above, but you'll need at least 5" of reach on your ratchet.

8. Now the PAS-pump is free, remove the union-bolt from the pipe on the left side and lift the pump out. It's best to wrap a cloth around the union-bolt when removing the pump to catch any PAS-fluid dropping into the engine, although the pump shouldn't spill a lot anyway. **Plug the end of the metal-pipe.

9. Install the new PAS-pump, replace the pipe/union-bolt and insert the 3 bolts holding it in place.


10. Slide the new belt into position on the 3 pulleys. Lift the alternator until the belt is tense and replace the bolt that holds the adjusting-bolt in place. Now tighten the adjusting belt to the torque mentioned in the Workshop Manual [here] or just until the top stretch of the belt can be moved about 5mm up or down.

11. Replace the rubber return-hose and finger-clip to the top of the PAS-pump.

12. Snip off the cable-tie, swivel the throttle-cable back into its natural position in the bracket and retighten the 12mm nut on the far side.

13. Add PAS-fluid to the pump and allow it drain into the system and air to come out until the fluid reaches the measuring-scale on the cap.

Wednesday, 5 January 2011

Homemade Decals 1st Attempt - AUTOBACS

I got a load of vinyl off the lads who come in to sign-write our vans at work, so I've been planning, in true ScoobyLab styler, to have a go at making my own graphics and decals for the car - when I get round to it. Couldn't wait to make a test piece though, so I spent an hour of my bank-holiday bashing up this little Autobacs number...


Ok, so under a microscope you can see they're a bit rough around the edges, but for glancers they look the part. They weren't hard to make either. I got the logo and reversed the image horizontally. This way I can stick it onto the back of the vinyl so I can see what I'm cutting then, when the stickers are applied, the letters show up the right way round on the shiny side. As for the cutting I just used sharp scissors and a Stanley-knife.


Who are AUTOBACS? Well, they're basically just the Japanese Halford's. The Japs are crazy over their cars though, so they revere these stores like gods and proudly show off Autobacs decals, so I thought it'd be a good talking point for discerning modders, although anyone who's switched on enough to mention it would probably ask why I'd made my own stickers.

Check out the awesome AUTOBACS site - http://www.autobacs.com/world/

Here's a great vid from an ancient Top Gear with [a young and funny] Clarkson browsing round the Autobacs flagship store in Tokyo.

Monday, 3 January 2011

New Halogen Spotlamp Bulb - wrong type.

Well, happy new year everyone and as I'm so desperate to get back working on the car I've kicked off 2001 by buying another high-power halogen bulb to make my old O/S spotlamp match the one I bought recently. Problem is I made a hasty choice and bought the wrong kind. Even after describing the multi-coloured type to the guy in Halfords and re-checking the colour of the bulb itself it still turned out to just be a white glow, with a little bit of blue in the middle and looks more like the one it replaced. £8.99 in the gutter. Ah well, I guess I'll have to keep looking, or just change the coloured one for the original white one I took out today.


FITTING:

Changing the fog/spotlamp bulbs only takes a minute, but its more fiddly than I expected so heres the process.

1. Remove the 3 bolts holding the spotlamp in place using a 10mm wrench.

2. Unclip the plug on the spotlamp wire and slide it free of the wiring-harness in the bumper.

3. Turn the grey seal-plug anti-clockwise until it can be lifted out of the seal. Be careful not to pull too hard on the wiring.

4. Slide the earth-wire, with the light-blue rubber-sheath, up off its mount on the spotlamp chassis.

5. Slide the end of the live wire, coming off the base of the bulb, out of its socket in the seal-plug. The socket sits in a mount and can be lifted out to make it easier.

6. Push down the metal-wire clip behind the bulb at the side nearest the gray-plastic adjustment-bracket and move the wire-clip out of its mount and rotate it out of the way.

7. Replace the bulb with the new one and reverse the process.

Sunday, 2 January 2011

Relocating the Stock-Aerial Part 1

I know Scooby's aren't designed with aesthetic perfection in mind, but its a shame they follow the utilitarian Japanese convention of bolting a tacky plastic thing on afterwards with an 80's pull-out style aerial in, usually on the driver's A-pillar. Even the 60-reg Toyota Hilux coming in at work, which are pricey trucks, still have these things and, while I'm sure they function superbly, they don't half look crap.

I've been planning to re-locate the aerial onto the roof of the Scoob for a while now and change it from a tacky telescopic metal one to a BMW-style 'shark-fin', but you could fit a rally-style mast-aerial, a bee-sting or a GPS-box lookalike in the same way. Its not a difficult job at all, but a brave enough one for me to struggle to get round to it. Doesn't look like it'll be any time soon, with all the other jobs mounting up [
power-steering is gonna need looking at first I think], but I reckon its a sound idea so I'll write it up anyway.

Removing the Stock Aerial:

Unclip and remove the plastic cover on the driver's A-pillar inside the car and cut the wires going to the aerial-mount.

Remove the two screws holding the aerial-mount with a flat-head screwdriver and prize the plastic-mount away from the a-pillar.

Bridge the holes in the a-pillar with metal-filler, or just stick about 5 layers of black-tape over the back of them, then fill the outer layer with P38 body-filler. Its only a tiny area so shouldn't be hard to sand, prime and paint-match.

Installing the New Aerial:

Inside the car, unclip and pull down the roof-lining. I'm still unclear on how to do this so, for now, refer to the Body section of the workshop manual here - http://www.scoobylab.co.cc/2010/12/manuals.html.

Find a suitable spot and drill a hole wide enough for the new-aerial's mounting-stud. Drill from the outside in and it's easy to dent the roof so drill slowly, use plenty of oil on the bit and it might be worth starting with a small pilot-hole to make sure the location is accurate.

Place the mounting-stud of the new-aerial through the hole and stick the base down onto the roof. Tighten the nut onto the mounting-stud inside the car.

Extend the cut-off wires at the a-pillar, if necessary, across the inside of the roof to meet the cable on the new-aerial and tape it into place. It's likely the new unit will have a male FM-aerial connector on it [same as the one in the dash that plugs in to the head-unit], so you could cut it off and hard-wire it, but for a nicer job I'd recommend getting a female FM-aerial socket from Halford's for a couple of quid and crimping it to the a-pillar wire. That way the aerial can be un-plugged easily if some idiot decides to nick your new bee-sting and you have to a quick replacement.

Clip the roof-lining back up into place and replace the plastic-cover to the inside of the a-pillar.

Friday, 31 December 2010

Nick's Auto-Sprint BMW Race-Car

It turns out Nick, our new workshop manager at work, is an old hand on the amateur racing circuit and [as we've quickly learned] he doesn't do things by halves. For his semi-pro rally-cross efforts he has an ex Hannu Mikkola Audi Sport Quattro [like this], blimey, but for fear of 'getting it dirty' he is now building a new car at work to use for auto-sprint racing next year.

The car he's picked is an old BMW 318is Coupe, which has sat in the corner of our workshop since May, but lately its moved up onto the ramps and work on it has really started to come along, so I'm devoting a thread to the Beemer to cover the ongoing conversion from road car
to all out auto-sprint machine and hopefully chronicle some of its racing efforts. Stay tuned!


As you can see from yesterday's pictures, she won't be racing anytime soon and has long missed her intended debut at the New Brighton Rally in September, but its not as far off completion as it looks. The engine is only a 1.8 and still in stock form for now and I'm dying to see what he will eventually do to it, but probably not much, as for short distance auto-sprint events the pace is generated by an ultra-high ratio gearbox, which probably cost a bit and will be the last thing to go on the beemer.

So here's a list of what has been done to the car so far:

Stripped to the shell - everything except the dashboard out, red + white paintjob, 'Network Q Rally' number-placards on doors.

M3 wing-mirrors.

Battery moved into the boot for weight-balance with new high-power wiring and Elec. + Engine cut-off switches in the dashboard and outside the car in a flat recess in the passenger front wing.

Alloy racing fuel filler-nozzle. No idea how this was done because all E36 BMWs have a body-flush flap, so this one must have been welded into place and a hole cut to mount the alloy-nozzle. It was on the car as Nick got it, so it looks like it was destined for the racetrack anyway.

Fixed-height 'auto-sprint' dampers and lower, uprated springs.

100% custom 'sway-bars' on the back, manufactured at work.

Single Corbeau bucket-seat.

Custom side-exit exhaust system with a tiny sports-cat, motorbike silencer and a curved tailpipe coming out just in front of the rear-wheel. It needed the whole driver's footwell cutting out to fit [you can just see in the bottom-left of the third photo where it's been put back in] and is one of the coolest things I've seen.

COMING UP:

Fully-customisable L.S.D!

Hydraulic hand-brake, made from a scrapped Leyland DAF brake master-cylinder, ha.


Thursday, 30 December 2010

VectraLab - SL's new sister-blog!

That's right folks, ScoobyLab has a twin. VectraLab will be covering the life, times and trials of my mate Mike's awesome 2001 Vectra B 'Irmscher' project car... big!


If you're into your Vauxhalls then stay tuned for some big things in the new year!

ScoobyLab's original Vec-Lab page - http://scoobylab.co.cc/p/veclog.html


Tuesday, 28 December 2010

ScoobyLab for iPad + Gran Turismo 5!

A member of my family recieved an iPad for Christmas so, naturally, I hit up ScoobyLab to see how it looked on the thing and noticed quite a few errors occurring. Its the same story when I've checked on my friend's iPhones [as mine is water-damage dead :(], with Flash not working at all and any fixed-size object jumping into a weird position, so I've spent some time making the layout compatible while I still have the iPad around to check it on.

I'm pleased to say that the blog is now almost completely working on iPad and comes up more or less correctly on most mobile/smart-phone browsers, but I'm still having trouble with the iPhone display. It's a tricky fix, but I've found some great code for accessing the iPhone menu-functions themselves to make clicking the drop-downs easier, so that'll be exciting anyway.

** The other great news is that Gran Turismo 5 has finally landed on my doorstep! When I bought my PS3 [over 2 years ago!] we we're promised GT5 by the following January and boy, it just went on and on didn't it?! My sister has made up for the wait though [bless her] by getting hold of a Collectors Edition box-set for me crizzy prezzy, which comes with 5 unique 'ChromeLine' cars [in the pic] and the 1/2-thick 'Apex' book full of driving techniques and glossy stuff, which is very nice. Its basically an updated version of everything you got in the manual with the original GT games, but I guess in these gloomy economic times they have to sell it as an add-on. Either way its a nice bit of coffee-table literature for gamers and car chums alike as we while away the frugal months ahead with the best racer ever!

As for the game, well it speaks for itself! After all the hype it couldn't possibly turn out a disappointment and I'm happy to say the graphics and gameplay really rocks. When the game eventually installed I was a little cold at first because the intro-movie and menu screens just looked the same as before. They look old, in fact, for the PS3, but once I got maybe two races in I'm already starting to think this could be the best GT yet. I didn't expect them to change the driving-engine from GT5 Prologue, but it feels much, much better to me - smoother and a little easier too. The choice of extra-modes is also staggering, stuff like go-karting and NASCAR is utter sickness and have the potential to be just magnificent online. If you haven't already bought the game and don't take my word for it, then check the GT website - http://eu.gran-turismo.com/gb/.

While we're on the subject of GT5 I thought I'd use this thread to list any cool cars and achievements I stumble upon that are worth noting:


Cars:

These are all tuned up and can be used from the outset in all modes [except Sunday Cup races], but don't count as purchased cars.
ChromeLine BMW M3
ChromeLine Lamborghini Murcialago
ChromeLine Gullwing Merc. 300SL
ChromeLine Shelby Cobra
ChromeLine Audi R8 V10

Silvia S15 Q's Aero Well its between this or the Mitsi 3000 for the sub 20k first car, so a no brainer really.
'89 MOTUL Civic Race Car OK so you win it right away, but its a beast of an FF car!
Nissan SilEighty Another early win - the front of a Silvia / back of a 200SX [180SX in Japan], I love these things.
Impreza STi Type R '99 Wahey my first Scooby, I've always wanted a coupe.


Monday, 27 December 2010

Lowering the Roof Height

Its not a mod I would have thought of for a Scooby, but I spotted this absolutely mental Blobeye STi in a mag [built by Jap shop C.S Hiro http://www.cshiro.co.jp/], with its roof lowered! I've only ever seen this done to classic cars, mainly American metal, although I've seen a few Vauxhall Victors with it done in the UK, but as it turns out the modern Scooby shares a key bit of design with the aforementioned that makes it an ideal motor to do a roof-chop on!

The Impreza has sashless-doors, which of course means that there is no frame around the window glass and that means no alterations need to be made to the doors at all. When the roof height drops, the windows will still rise up and fill the gap perfectly, with the lower part of the glass permanently sitting in the door. In theory the four windows would each fit flush even if the roof wasn't perfectly straight. Chopping the height out of 4 normal doors separately, then matching them to the roof would be a difficult task and this makes it a super-expensive job for most motors. Examining the Scoob though, it looks like all you'd need to cut are the 6 roof pillars and this makes it a much easier job, one you could do at home in fact with enough time and ingenuity.


THEORY:

Roof-Chop:

Wind the windows fully down. Remove the front and rear windscreen, along with both wing-mirror chassis, the roof-lining, a-pillar covers, parcel shelf and unbolt the front seat-belt holsters off the b-pillars.

Sand the a and c-pillars down to the bare metal.

Mark along the base of each roof pillar and cut straight through into the cabin, without deforming the metal. You could probably do it with a small grinder, but an oxy/acetylene 'plasma-cutter' would be ideal to cut a neat curve.

Lift the roof off the car. Mark around the neck of each pillar at a suitable height for the roof to be lowered by [probably about 3 ins.] and cut them again, then file down the remaining pillar ends, as well as the cut-edges on the car body, to as flat an edge as possible.

Lower the roof back onto the car, marry the pillars to their bases and weld completely around where they meet. Grind the welds down and rub them flush to the body with emery cloth. Build up around the visible joins with metal-filler and P38-filler and sand them in a smooth line between the body and pillars. Re-paint the a and c-pillars. Shorten the plastic pillar-covers to fit and replace the roof-lining etc.

Roll-Cage:

** The rigidity of the roof is probably compromised quite a bit by this process so its essential to fit a roll-cage really to stiffen things up, but primarily for safety. If this isn't a major concern you could get away with just bolting or welding in a steel-tube down the inside of the b-pillar from floor to roof.

Windscreens:

With the roof sorted, the real challenge is to make the windscreens the right length to fit. Normal Scooby windscreens are about £200+ so a tailor made narrow one probably isn't cheap, but I've found TW Windscreens in Southampton who will make one. On the other hand, I've seen cut windscreens lying around at work done using a great grinding-disc that only damages about half a cm around the line of the cut. We reckon you could cut the bottom away from the windscreen and seal the fractured edge with epoxy-resin. Then, when the windscreen is sealed in place, make a plastic or rubber sill to overlap the bottom edge [which seems to be the case on the C.S Hiro car anyway] and a smaller one for the rear.

Seatbelts:

Belts are a major safety thing, so if you've made the mounting-holes on the b-pillars too low then its worth scrapping the lap-belts and installing racing harnesses, which the standard STi and post MY96 seats will take. Otherwise you'll need to drill a new hole further up the b-pillar if possible and thread it with a fairly large tap, but the bolt might need shortening as the gap behind gets narrower at the top.


Friday, 24 December 2010

Merry Xmas!

Seasons greetings and all the best for the new year from ScoobyLab!

I hope you've been enjoying the freezing conditions as much as we have and may Santa bring many shiny JDM parts down your chimney!

Can't wait to start working on the car again in the new year, when I'll be enhancing the boot-install with a boot-lid skin and a storage compartment, as well as restoring the power-steering system, which may result in a whole new PAS-pump so stay tuned...

Saturday, 18 December 2010

Quick Bumper Fix

I must have got a bit over zealous on the way to work on Thursday morning [racing Big Alex in his Isuzu Trooper 3L], because my back-bumper started to make its way off the car, luckily just as we were pulling up at the gate. The small bolt that holds the corner of the bumper by the wheel-arch has broken free of its rusting mount, leaving the right-side edge hanging loose and letting the bumper become wayward. The plastic-mount on the bumper has obviously always had a break in it, probably after that wheel-arch's scuff with a gatepost, but it was still clinging on. Once the bolt had made its way out of the body though the bumper didn't put up much resistance and the bolt is long gone. All this means there's no meat left to get a cable-tie round so I had to just drive carefully and pray the bumper didn't drop completely before the fix.

Everyone suggested just banging a self-tapping screw through into the metal, but that'd be too easy and no good if I need to take the bumper off in future. Instead I rustled around in the ever fruitful skip for a few minutes and found a nice allen-head bolt, two shiny washers and a brand new nyloc-nut. Outstanding. There's another small hole in the bumper just behind the split one, so I marked where it meets the body-lip and drilled a 5mm hole through the metal. Even with the car tilted on the curb I could barely get my hand into the gap between the tyre and wheel-arch, so I could barely hold the allen-key steady while I got the nut on. In the end I just managed to get the nut a few turns into the nylon, but enough to keep the bumper on until today when [with no help from the weather!] I got the wheel off and tightened it up.


>>> Oh and yeah, I do notice that the rust has creeped out from under the wheel-arch. There's a bit of bubbling too so both arch-lips are going to need rubbing-down and spraying again as soon as the weather turns reasonable, just hope it doesn't get much worse in the meantime. The moral of the story here kids is ALWAYS lacquer as soon as possible after spraying and wax-oil/seal the underside if its somewhere like the wheel-arch! Nightmare.


Saturday, 11 December 2010

Carbon Conundrum + Bodywork Update

Spotted this amazing 100% carbon-fibre bodied, Japanese-built Blobeye STi in a mag at work - yeyah! It's got me thinking about carbon again, but I've only got a small patch of the stuff left [about 12x12ins.], which wouldn't even cover a wing-mirror, so I'll have to find something small to fab-up while the weather is too cold to move forward with the car itself.

I have thought about styling, but so far the favourite option is to finish off my alloy-plate cold-air shield with carbon instead. I do have the plate pieces cut and getting hold of a TIG-welder [special light-metal welder that doesn't just rip alloy apart] was something I dearly wanted to have a go at, but to fill the winter gap and get on I may as well bring some more carbon to the engine bay.

And I must finish that darn wind-diffuser!! SHEESH!

** Also I'd like to say a massive big-up to Dave from Howarth's Bodyshop in Pensby [who do various bits on our firm's vehicles] for passing on a couple of cans of Zinc-Primer [which I never have enough of] and Filler-Primer, which I've not used before. Apparently it's the mutts-nuts for filling in the tiniest gaps and smoothing the paint-surface, so we'll have to give it a whirl if I find time to re-spray the wheel-arches. Respect! Will have to ask Dave about spraying my black front-bumper silver so I can replace the damaged one... **

Tuesday, 7 December 2010

More snow donuts...

Bit more donut fun early this morning. Getting the Scoob sliding a bit more easy now, but it felt a lot warmer today so the snow is on its way out I reckon. Probably for the best - I dunno how much the Scoob can take. Yeah, I know its only ice and there's not nearly as much strain on components as a dry road, but strain is still there and high-revving like that can't be good first thing in the morning, even with a warm engine so naturally I checked the car throughout the day. Neuroses over a couple of snow donuts, I guess I'm just not cut out for this lark haha...

Monday, 6 December 2010

Snow Fun + Update

Well the snow and ice has worsened and brought all work on the car to a halt. I guess this is it until the new year, so I might as well focus on actually driving the thing... and thats one part of the snow and ice nightmare that we can console ourselves with!

I've been dying to donut and drift the Scoob around, but I daren't try it on the gravel car-park at work. It's a different story when its covered in ice though so I chucked it round for a few practice spins afterwards with Laney filming. If we get a good freeze tonight the car-park should be like an ice-rink so I'll have to try and get to work early one day and film some in the daylight!

And yes, this is completely private land with nobody around - the only thing I might harm is my back-tyres...


The Scooby's 4WD has been amazing on the ice - no wheelspins when pulling away and the grip on a wet/slushy roundabout is phenomenal. On the other hand, all this grip is not great if you just want to tit about throwing the back-end around, even on the ice. Spin all four wheels and the front wheels slide onwards with the back ones and it won't snap round easily. Even with less than half the horse-power and no LSD, the RWD Beemer was more giving on the ice when you chuck the back out, where the Scooby finds it hard to let go, so I've really had to put it into a tight handbrake before dumping the clutch. The handbrake was never good enough in the BMW to do that, even on ice, but no need - just drive in a circle normally until the back-end goes and enjoy!

It would seem that the mighty Subaru needs a bit more figuring out before I start attempting this on wet-roundabouts....

Thursday, 2 December 2010

The 'Black Socket Trick'

Machines that read fault-codes aren't cheap, starting at about £350 and running into thousands for a pro one, so its good to know that Subaru, like a lot of other Japanese marques, builds in a gizmo that lets us check the codes ourselves, at the roadside if we need to.

There is a male and female plastic connector hanging loose just behind the trim under the steering column, just behind where the socket for the OBD-type reader is. The connectors are unplugged from each other by default and clipping them together bypasses the circuit for the OBD socket so the car's own can be used.

Once the two connectors are clipped together, turn the key so the ignition is fully on, without starting the engine. The CHECK ENGINE light will do a series of long and short flashes. First come the long flashes [about 1 sec each], which denote the first digit of the fault-code and then quick flashes, which denote the second digit. i.e two long and three short would be a fault-code 23.

Here is the LIST OF FAULT CODES that work with the system.

[The car still works with the connectors left plugged in, but its probably best to unplug them to save the car doing a check every time you start up and make the OBD socket accessible if you take the car in to a garage. Not that any ScoobyLab fan should ever have to!]

Sunday, 28 November 2010

Wing-Mirror Fixed!!

The wing-mirror had obviously been knocked off at some point in the past and it was held on a by a massive wrap of strong tape that looked ghastly. I recently decided to replace that with nicer looking black-tape, but it just wasn't up to the job. Rather than chuck loads more tape on I decided it was time to just bite the bullet and fix it as I can't lacquer the car this weekend.


The metal mount has sheared clean off, but there's no damage at all to the wing-mirror casing and the electric swivel still works so it seemed a bit of a waste to buy a whole new unit [starting at about £30 on eBay for a used one] when there's probably a way to fix it. The metal mount is only alloy so I figured it wouldn't be hard to drill a hole in both parts and get a bolt through. There's plenty room in the casing to hide the bolt and for a real tidy touch I drilled through one of the existing screw-holes on the door-mount so the bolt-head is also hidden away, which also made drilling a lot easier. The screws only hold the plastic-casing onto the mount and there are 3, so I think I can afford to lose one.


Hiding the bolt-head means the work I've done is invisible, but I had to use a 4mm bolt to fit the head up into the existing screw-hole. Even a slim steel bolt won't snap easily, but I would have liked to use a fatter one just to reinforce against those wheelie-bin knocks as it can't swivel inwards, but it couldn't with the black-tape anyway so I'll have to carry on being careful. I was beginning to think the job was suspiciously easy when I hit my first snag - tightening the bolt without the nut spinning around. To do this I had to remove the mirror-glass and motor-bezel to make a small gap to slide a spanner through and grip the nut. The plastic around the nut was still very constricting and the spanner had to be poised perfectly on the edges of the nut to get a few turns before it gave and had to be repositioned, which was frustrating but I got there in the end so money well saved.


As you can see from the ice on the windscreen my fingers were numb and blue but I think it was worth it to finish both this and the spotlamp in one weekend. It may not swivel or be as sturdy as a replacement, but its just as good as the black-tape and the mirror looks positively brand-new, so if it lasts me for as long as I have the car then result!

Saturday, 27 November 2010

New Spot-Lamp Sorted!!

Wow, the weather really has turned bitterly cold this week and spray-work is out of the question. I think that to get the lacquer on before xmas now will need somewhere indoors to do it, but I did find a real spot-light this week to replace the fake one so, even though my fingers were numb and purple I just had to get it on. After all, we might have fog again tomorrow...

A while ago I got hold of a replacement front-bumper from a mint import car and luckily it holds the bracket I needed for my missing spot-lamp, which made finding the new one much easier. I will be replacing the whole damage-repaired bumper eventually, but the new one is black so I'll have to get it painted first, its a bit too big a spray job for me I reckon.

The spot-lights haven't been cheap on eBay lately, with a few on for £40+ and loads of pairs starting at £70. The lenses have Subaru etched along the bottom and the back of the lamp is angled, so you can't switch sides and have to rely on finding the one you need. I spotted a near-side one for £30 delivered from smr-subaru and thought what the hell. It took a week to arrive, but its in great condition [much better than my current one] and has a blue/rainbow type halogen bulb in it, which is nice, although I'll have to buy a matching one for the other side!


FITTING:

All 3 of the bolt-holes in the old bracket had broken off studs in them so the whole thing had to be replaced, but luckily the bracket just slides down off hooks and can be lifted out without removing the bumper. It slides out between the gap in the bumper corner so the under-tray doesn't even need to come off. The old wiring socket for the spotty has been hanging loose next to the wheel-well, so I gave it a good clean out with brake-cleaner and electrical solvent before plugging in and testing. The new bracket is off an import too and as you can see from the pic its in great condition with perfect threads so I bolted the new lamp in place with 3 more of those trusty alloy allen-bolts from the skip at work. The top-right bolt also holds the corner-indicator in place again, which is great as its been held on with a giant ball of ally-tape sincebefore I bought the car. I'm chuffed to bits to have this boxed off at last, the car is starting to look a lot less ratty - just gotta fix that broken wing-mirror and the body is complete!!

Saturday, 20 November 2010

N/S/R Wheel-arch Touch-Up

There's always been a few bubbles in the paintwork just behind the near-side rear wheel-arch, but they have grown a little bit over the year. Last week I pressed the blisters a bit and dirty water dribbled out so I decided it was best to act on the corrosion fast before the worst of the weather hits. I really should lacquer the work I did in June on the off-side rear wheel-arch when I finish this side off too, it shouldn't have been left so long - the paint is holding up so far, but best not to chance it with frost round the corner.

I started by carefully breaking the bubbled paint off with a sharp knife. The paint and primer had bubbled clean off the metal panel and was quite tough to break off still, but a few weak spots were obviously letting nasties in and there was just a little rust beginning under the lip at the bottom. Luckily the panel itself was holding up pretty well and wasn't showing any signs of actual rust, but there was lots of black pitting that went down quite deep into the surface.

I then rubbed down the area about an inch around the corrosion with 140-grit paper to get rid of the paint. The black pitting was a different story and it took quite a bit of rubbing with emery-cloth to get down the clean metal. I was still left with a few deep craters, so I managed to eek out one last mix from my tube of P38 filler and did a thin skim over the whole area to make sure even the smallest pits were filled, before sanding it flush to the metal. I then threw on a quick coat of zinc-primer and sanded it flush with some 600-grit Wet/Dry paper soaked in slightly soapy water, so I don't get panty-lines in the paint. I did start spraying the silver-coat on Sunday, but got a bit over-zealous and the paint ran something awful. Its back to work I go too, so I'll have to give it a quick rub down and finish the silver-coat next weekend, as well as lacquering this and the other wheel-arch - lets get some closure on the spray-work!!

More detailed descriptions of the rubbing, filling and painting processes can be found in the previous posts Painting the Bonnet Lip and Re-Inventing the Wheelarch Pt. I.


ScoobyLab + Propjam 2010/11