<-CLICK HERE FOR SCOOBY TECH. POSTS ONLY! CLICK HERE FOR GRAN TURISMO POSTS ONLY!->
1998 Impreza Turbo Project Car + Expanding WRX Knowledge Base!

Sunday, 30 January 2011

Selling the Scoob!

There's so much stuff I still want to do with the car - relocate the aerial to the roof and fit a shark-fin, bigger brakes, STi intercooler etc, + finish my damn carbon wind-diffuser - but the running problems that have started to develop, as well as the general running costs, have led me to the decision of selling the one and only Scoob. :(

I've been looking at diesel BMWs for a while now and eventually bought a W-reg 530d, which I'm now mainly using. Although I could afford to keep the Impreza if I took it off the road, I'm worried that if I keep it garaged somewhere the project will fall by the wayside and there just isn't space at home. My work doesn't help either - they've got me doing 6 days a week now and I'm struggling to fit everything into Sunday alone. The final straw came with fitting the PAS-pump, when family arrived and I spent the entirety of their visit fiddling with the Scoob. I know this level of commitment is required in a proper project, but I don't feel like I'm moving forward with the car any more. The last few frugal months have still been spent on repairing the car's faults, not saving for the next big mod and it seems this is set to continue until summer when it's MOT time - and who knows what else they might find wrong with her. All my modding inspiration is being postponed indefinitely and to be honest this has killed my enthusiasm.

To summarise the faults:

The £65 PAS-pump did not cure the steering whine so thats obviously the rack itself which are £100 for the cheapest used one and hellish to fit. It also didn't fix the ticking noise so that could now be anything - the water-pump, oil-pump, alternator, cam-belt or cam-pulleys etc...

The engine is still losing coolant after fitting the new radiator. It needs topping up every few weeks by a litre or two, although it's never since overheated.

The boot leaks. I've tightened the LED-lights in as much as possible and taped up around various places, but there is still water getting in, which pools in the spare-wheel well after a rainy few days. During the day the condensation from it fills the rear windscreen and windows. Worst of all, my amp and subs are often running with condensation and the carpet was full of ice over Xmas. Limp.

There's a knock from the front suspension, maybe a trailing arm, which can be heard when cornering over a bump at low speed or up a slope.

There is a squeaking noise coming from the n/s rear wheel. I would hope its just a sticky brake, but it could be a wheel bearing. :(

So the car is going on eBay. I've written a nice spiel for the advert [which leans mainly to the cars positives I'll be honest] and I'm starting the bidding at £1000, with a buyout price of £1500. Not bad I reckon just for the value of the parts on her, but the average 100k Scoob isn't going for much more than a grand and mine has just rolled onto 141k so we'll see how it sells.

Saturday, 29 January 2011

Saturday, 22 January 2011

Steering whine and ticking noise - not fixed!

The power-steering has always had a loud whine when turning at low-speeds, but it's safe to say this has worsened over the summer, where I could hear it while turning at higher speeds - roundabouts and stuff - and the after the snowy weather the whine can be heard turning in either direction most of the time. A ticking noise has also developed under the bonnet that seems to be coming from the front of the engine.

After much deliberation we decided it must be the power-steering pump on its way out with the ticking coming from its pulley. My friends had even begun to comment on the noises so I went ahead and bought the pump along with a new auxiliary-belt and spent a Sunday fitting them. The used pump I bought was definitely newer and in far better condition than mine, but if anything this made the problem worse. As soon as I fired her up the ticking noise was back and the whine could now be heard on tickover. I revved the engine and the whine went with it like a supercharger.

I can now only guess that the whining noise is coming from the steering-rack itself, which are expensive new. I can find used ones for about £100, but they are hellishly complex to fit. The ticking noise is worse, as it could be anything - the alternator-pulley, crank-pulley, oil-pump, water-pump, even the timing belt or cam-pulleys. Unless I book the car in with a pricey specialist I may never find the culprit - and I can't replace every part on the engine.

On top of this, I'm still having to top the engine up with coolant. It's such a shame that its still losing some over several weeks and there are still no signs of a blown head-gasket, so that may very well be the water-pump too. The coolant could be ending up in the boot however, but I suspect its probably just a leak. I have taped up around the rear-lights and tightened them as far as they will go into their recess over the last few months, but it seems they are determined to keep on letting in water. My subs and amp are often running with condensation and the carpet on the sub-box had ice all over it round xmas.

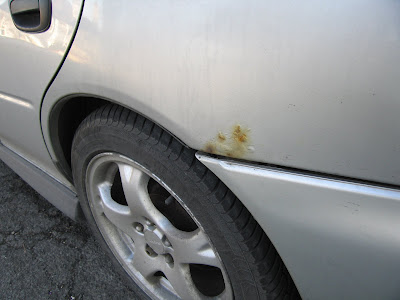
To top this little lot, I neglected to finish off painting the rear wheel-arches so rust has begun to creep back on both of them and they need redoing. It strikes me that as the weather gets nicer again, the forthcoming six months are going to have to be spent on a load more repair work, rather than getting back on the mods like I desperately want to. I was hoping to get the front TEINs on, fit bigger brakes, an STi intercooler to safely up power and then concentrate on the repairs come MOT time in June, but these problems won't wait and there could be a ton more on the test.

Its a crying shame, but I've decided to quit while Im ahead and move the car on to someone who will spend time on taking it to the next level, or just wrap my pride and joy round the nearest tree. I'll be listing the car on eBay shortly and we'll see what it makes. There is also a new BMW in the pipeline...

Saturday, 15 January 2011

Replacing the PAS-Pump

I wouldn't say this was a very advanced job, but it does get fiddly working in the confined spaces so the instructions are quite detailed. Also be prepared to contort your arms into horrible positions and make sure you have a socket-set with at least 5 inches of extra reach AS WELL as a 12mm and 14mm open-ended spanner, with as low a profile as possible.

PROCESS:

1. Slide the finger-clip down the rubber-hose that enters the top of the PAS-pump. Slide the hose off the metal-pipe on the pump and plug the end of the hose.

2. Remove the two bolts holding the pulley-cover in place using a 10mm wrench, then loosen the bolt on the right-side alternator bracket using a 12mm wrench a couple of turns so the pulley-cover can be slid out. Turn the pulley-cover over and push the plastic-stud that holds the throttle-cable clip out of its hole.

3. Using a 12mm open-ended spanner, loosen the far nut on the throttle-cable where it sits in the bracket as far as it will go so the cable can be pushed back and lifted out of the bracket. Swivel the cable so it clears the PAS-pump area and fasten it with a cable-tie.

4. Using a 14mm open-ended spanner, loosen the union-bolt that attaches the metal-pipe to the port on the left side of the PAS-pump. Only crack the bolt off a couple of turns so no fluid spills, but the bolt can be removed easily once the pump is no longer fixed in position.


5. Remove the bolt that is threaded through the long adjusting-bolt that moves the alternator up and down. There is no need to slacken the adjusting-bolt - once the holding-bolt is out, the alternator should drop down fully anyway.

6. Lower the alternator until the belt becomes loose enough to be slid off the pulleys.

7. Remove the 3 bolts holding the PAS-pump in place using a 12mm wrench. There are 2 bolts to the front of the pump, beneath the pulley, which are easy to find, but there isn't a lot of room to turn them. The third, to the rear-right of the pump can be accessed from above, but you'll need at least 5" of reach on your ratchet.

8. Now the PAS-pump is free, remove the union-bolt from the pipe on the left side and lift the pump out. It's best to wrap a cloth around the union-bolt when removing the pump to catch any PAS-fluid dropping into the engine, although the pump shouldn't spill a lot anyway. **Plug the end of the metal-pipe.

9. Install the new PAS-pump, replace the pipe/union-bolt and insert the 3 bolts holding it in place.


10. Slide the new belt into position on the 3 pulleys. Lift the alternator until the belt is tense and replace the bolt that holds the adjusting-bolt in place. Now tighten the adjusting belt to the torque mentioned in the Workshop Manual [here] or just until the top stretch of the belt can be moved about 5mm up or down.

11. Replace the rubber return-hose and finger-clip to the top of the PAS-pump.

12. Snip off the cable-tie, swivel the throttle-cable back into its natural position in the bracket and retighten the 12mm nut on the far side.

13. Add PAS-fluid to the pump and allow it drain into the system and air to come out until the fluid reaches the measuring-scale on the cap.

Wednesday, 5 January 2011

Homemade Decals 1st Attempt - AUTOBACS

I got a load of vinyl off the lads who come in to sign-write our vans at work, so I've been planning, in true ScoobyLab styler, to have a go at making my own graphics and decals for the car - when I get round to it. Couldn't wait to make a test piece though, so I spent an hour of my bank-holiday bashing up this little Autobacs number...


Ok, so under a microscope you can see they're a bit rough around the edges, but for glancers they look the part. They weren't hard to make either. I got the logo and reversed the image horizontally. This way I can stick it onto the back of the vinyl so I can see what I'm cutting then, when the stickers are applied, the letters show up the right way round on the shiny side. As for the cutting I just used sharp scissors and a Stanley-knife.


Who are AUTOBACS? Well, they're basically just the Japanese Halford's. The Japs are crazy over their cars though, so they revere these stores like gods and proudly show off Autobacs decals, so I thought it'd be a good talking point for discerning modders, although anyone who's switched on enough to mention it would probably ask why I'd made my own stickers.

Check out the awesome AUTOBACS site - http://www.autobacs.com/world/

Here's a great vid from an ancient Top Gear with [a young and funny] Clarkson browsing round the Autobacs flagship store in Tokyo.

Monday, 3 January 2011

New Halogen Spotlamp Bulb - wrong type.

Well, happy new year everyone and as I'm so desperate to get back working on the car I've kicked off 2001 by buying another high-power halogen bulb to make my old O/S spotlamp match the one I bought recently. Problem is I made a hasty choice and bought the wrong kind. Even after describing the multi-coloured type to the guy in Halfords and re-checking the colour of the bulb itself it still turned out to just be a white glow, with a little bit of blue in the middle and looks more like the one it replaced. £8.99 in the gutter. Ah well, I guess I'll have to keep looking, or just change the coloured one for the original white one I took out today.


FITTING:

Changing the fog/spotlamp bulbs only takes a minute, but its more fiddly than I expected so heres the process.

1. Remove the 3 bolts holding the spotlamp in place using a 10mm wrench.

2. Unclip the plug on the spotlamp wire and slide it free of the wiring-harness in the bumper.

3. Turn the grey seal-plug anti-clockwise until it can be lifted out of the seal. Be careful not to pull too hard on the wiring.

4. Slide the earth-wire, with the light-blue rubber-sheath, up off its mount on the spotlamp chassis.

5. Slide the end of the live wire, coming off the base of the bulb, out of its socket in the seal-plug. The socket sits in a mount and can be lifted out to make it easier.

6. Push down the metal-wire clip behind the bulb at the side nearest the gray-plastic adjustment-bracket and move the wire-clip out of its mount and rotate it out of the way.

7. Replace the bulb with the new one and reverse the process.

Sunday, 2 January 2011

Relocating the Stock-Aerial Part 1

I know Scooby's aren't designed with aesthetic perfection in mind, but its a shame they follow the utilitarian Japanese convention of bolting a tacky plastic thing on afterwards with an 80's pull-out style aerial in, usually on the driver's A-pillar. Even the 60-reg Toyota Hilux coming in at work, which are pricey trucks, still have these things and, while I'm sure they function superbly, they don't half look crap.

I've been planning to re-locate the aerial onto the roof of the Scoob for a while now and change it from a tacky telescopic metal one to a BMW-style 'shark-fin', but you could fit a rally-style mast-aerial, a bee-sting or a GPS-box lookalike in the same way. Its not a difficult job at all, but a brave enough one for me to struggle to get round to it. Doesn't look like it'll be any time soon, with all the other jobs mounting up [
power-steering is gonna need looking at first I think], but I reckon its a sound idea so I'll write it up anyway.

Removing the Stock Aerial:

Unclip and remove the plastic cover on the driver's A-pillar inside the car and cut the wires going to the aerial-mount.

Remove the two screws holding the aerial-mount with a flat-head screwdriver and prize the plastic-mount away from the a-pillar.

Bridge the holes in the a-pillar with metal-filler, or just stick about 5 layers of black-tape over the back of them, then fill the outer layer with P38 body-filler. Its only a tiny area so shouldn't be hard to sand, prime and paint-match.

Installing the New Aerial:

Inside the car, unclip and pull down the roof-lining. I'm still unclear on how to do this so, for now, refer to the Body section of the workshop manual here - http://www.scoobylab.co.cc/2010/12/manuals.html.

Find a suitable spot and drill a hole wide enough for the new-aerial's mounting-stud. Drill from the outside in and it's easy to dent the roof so drill slowly, use plenty of oil on the bit and it might be worth starting with a small pilot-hole to make sure the location is accurate.

Place the mounting-stud of the new-aerial through the hole and stick the base down onto the roof. Tighten the nut onto the mounting-stud inside the car.

Extend the cut-off wires at the a-pillar, if necessary, across the inside of the roof to meet the cable on the new-aerial and tape it into place. It's likely the new unit will have a male FM-aerial connector on it [same as the one in the dash that plugs in to the head-unit], so you could cut it off and hard-wire it, but for a nicer job I'd recommend getting a female FM-aerial socket from Halford's for a couple of quid and crimping it to the a-pillar wire. That way the aerial can be un-plugged easily if some idiot decides to nick your new bee-sting and you have to a quick replacement.

Clip the roof-lining back up into place and replace the plastic-cover to the inside of the a-pillar.
 
ScoobyLab + Propjam 2010/11