<-CLICK HERE FOR SCOOBY TECH. POSTS ONLY! CLICK HERE FOR GRAN TURISMO POSTS ONLY!->
1998 Impreza Turbo Project Car + Expanding WRX Knowledge Base!

Sunday, 28 November 2010

Wing-Mirror Fixed!!

The wing-mirror had obviously been knocked off at some point in the past and it was held on a by a massive wrap of strong tape that looked ghastly. I recently decided to replace that with nicer looking black-tape, but it just wasn't up to the job. Rather than chuck loads more tape on I decided it was time to just bite the bullet and fix it as I can't lacquer the car this weekend.


The metal mount has sheared clean off, but there's no damage at all to the wing-mirror casing and the electric swivel still works so it seemed a bit of a waste to buy a whole new unit [starting at about £30 on eBay for a used one] when there's probably a way to fix it. The metal mount is only alloy so I figured it wouldn't be hard to drill a hole in both parts and get a bolt through. There's plenty room in the casing to hide the bolt and for a real tidy touch I drilled through one of the existing screw-holes on the door-mount so the bolt-head is also hidden away, which also made drilling a lot easier. The screws only hold the plastic-casing onto the mount and there are 3, so I think I can afford to lose one.


Hiding the bolt-head means the work I've done is invisible, but I had to use a 4mm bolt to fit the head up into the existing screw-hole. Even a slim steel bolt won't snap easily, but I would have liked to use a fatter one just to reinforce against those wheelie-bin knocks as it can't swivel inwards, but it couldn't with the black-tape anyway so I'll have to carry on being careful. I was beginning to think the job was suspiciously easy when I hit my first snag - tightening the bolt without the nut spinning around. To do this I had to remove the mirror-glass and motor-bezel to make a small gap to slide a spanner through and grip the nut. The plastic around the nut was still very constricting and the spanner had to be poised perfectly on the edges of the nut to get a few turns before it gave and had to be repositioned, which was frustrating but I got there in the end so money well saved.


As you can see from the ice on the windscreen my fingers were numb and blue but I think it was worth it to finish both this and the spotlamp in one weekend. It may not swivel or be as sturdy as a replacement, but its just as good as the black-tape and the mirror looks positively brand-new, so if it lasts me for as long as I have the car then result!

Saturday, 27 November 2010

New Spot-Lamp Sorted!!

Wow, the weather really has turned bitterly cold this week and spray-work is out of the question. I think that to get the lacquer on before xmas now will need somewhere indoors to do it, but I did find a real spot-light this week to replace the fake one so, even though my fingers were numb and purple I just had to get it on. After all, we might have fog again tomorrow...

A while ago I got hold of a replacement front-bumper from a mint import car and luckily it holds the bracket I needed for my missing spot-lamp, which made finding the new one much easier. I will be replacing the whole damage-repaired bumper eventually, but the new one is black so I'll have to get it painted first, its a bit too big a spray job for me I reckon.

The spot-lights haven't been cheap on eBay lately, with a few on for £40+ and loads of pairs starting at £70. The lenses have Subaru etched along the bottom and the back of the lamp is angled, so you can't switch sides and have to rely on finding the one you need. I spotted a near-side one for £30 delivered from smr-subaru and thought what the hell. It took a week to arrive, but its in great condition [much better than my current one] and has a blue/rainbow type halogen bulb in it, which is nice, although I'll have to buy a matching one for the other side!


FITTING:

All 3 of the bolt-holes in the old bracket had broken off studs in them so the whole thing had to be replaced, but luckily the bracket just slides down off hooks and can be lifted out without removing the bumper. It slides out between the gap in the bumper corner so the under-tray doesn't even need to come off. The old wiring socket for the spotty has been hanging loose next to the wheel-well, so I gave it a good clean out with brake-cleaner and electrical solvent before plugging in and testing. The new bracket is off an import too and as you can see from the pic its in great condition with perfect threads so I bolted the new lamp in place with 3 more of those trusty alloy allen-bolts from the skip at work. The top-right bolt also holds the corner-indicator in place again, which is great as its been held on with a giant ball of ally-tape sincebefore I bought the car. I'm chuffed to bits to have this boxed off at last, the car is starting to look a lot less ratty - just gotta fix that broken wing-mirror and the body is complete!!

Saturday, 20 November 2010

N/S/R Wheel-arch Touch-Up

There's always been a few bubbles in the paintwork just behind the near-side rear wheel-arch, but they have grown a little bit over the year. Last week I pressed the blisters a bit and dirty water dribbled out so I decided it was best to act on the corrosion fast before the worst of the weather hits. I really should lacquer the work I did in June on the off-side rear wheel-arch when I finish this side off too, it shouldn't have been left so long - the paint is holding up so far, but best not to chance it with frost round the corner.

I started by carefully breaking the bubbled paint off with a sharp knife. The paint and primer had bubbled clean off the metal panel and was quite tough to break off still, but a few weak spots were obviously letting nasties in and there was just a little rust beginning under the lip at the bottom. Luckily the panel itself was holding up pretty well and wasn't showing any signs of actual rust, but there was lots of black pitting that went down quite deep into the surface.

I then rubbed down the area about an inch around the corrosion with 140-grit paper to get rid of the paint. The black pitting was a different story and it took quite a bit of rubbing with emery-cloth to get down the clean metal. I was still left with a few deep craters, so I managed to eek out one last mix from my tube of P38 filler and did a thin skim over the whole area to make sure even the smallest pits were filled, before sanding it flush to the metal. I then threw on a quick coat of zinc-primer and sanded it flush with some 600-grit Wet/Dry paper soaked in slightly soapy water, so I don't get panty-lines in the paint. I did start spraying the silver-coat on Sunday, but got a bit over-zealous and the paint ran something awful. Its back to work I go too, so I'll have to give it a quick rub down and finish the silver-coat next weekend, as well as lacquering this and the other wheel-arch - lets get some closure on the spray-work!!

More detailed descriptions of the rubbing, filling and painting processes can be found in the previous posts Painting the Bonnet Lip and Re-Inventing the Wheelarch Pt. I.


Saturday, 6 November 2010

Return of the MAF!! - Sensor Replaced!

It's less than a week since the car died and I've managed to get her up and running again, thanks mainly to a lot of help from the ScoobyNet massive. I really thought it was curtains this time - the car just seemed so poorly on Tuesday, coughing, spluttering and idling so crazily - all the signs of a generally broken engine and I would have never have known where to start diagnosing it without all the help and advice from the forum and its free - diagnostics are renowned for running up huge bills at garages, so the Scooby community really is worth its weight in gold.

With the mechanics at work all pointing to a broken head-gasket, I nearly started the horrible job of ripping the engine apart, but now I've discovered the black-socket trick for reading your own fault-codes, [which I will have to cover properly in its own post soon - I've never seen anything so trick!] I know I won't be needing dodgy opinions in the future. Much better to get info from people who know their Scoobys inside out!

By Friday I'd got in touch with a lad on eBay called BigEd4244 who had a couple of Purple MAFs for sale, and asked me to make him a serious offer. I said £70 and he messaged back to say he'd take £90 and send the unit next-day delivery, so I agreed and sure enough the MAF was waiting for me when I got home on Saturday. Fantastic, helpful service! A new one of these would set me back £289, so mine would have been literally cheap at twice the price.


Fitting it couldn't be easier. It's held in place by one of the bolts that hold the top-hat adaptor for the air-filter, which is fine if you have a cone like me, but getting the bulky, standard air-box off is a bit more involved, so check page 2-7 [W1A1] in the Subaru Workshop manual [download here] if you do have the latter. This process is the same for all Classics after MY97.

PROCESS:

1. Disconnect the battery earth-terminal.

2. Unplug the wiring-socket from the near-side of the MAF-unit by depressing the clip and sliding it out.

3. Remove the air-filter by undoing the jubilee-clip with a screwdriver.

4. Remove the four bolts holding the top-hat adaptor for the filter onto the MAF-unit using a 10mm wrench.

5. Undo the jubilee-clip holding the MAF-unit to the turbo-inlet hose and gently lever the MAF-unit down into the gap below until it breaks free of the rubber-hose.

6. Wipe around the mouth of the rubber-hose and the terminals on the MAF wiring-socket and reverse the previous 5 steps to install the new MAF-unit.

I am now reveling in smooth-running bliss. The engine feels so content through the rev-range now that I can't help wondering if the MAF-sensor has been on its way out for a while, becoming more and more noticeable with the cooler weather. I'm well annoyed that this £90 couldn't have been spent on improving the car elsewhere, but I guess keeping it on the road comes first. Cars eh?

Wednesday, 3 November 2010

MAF Sensor Trouble, Car Dead!

Oh my days, I've had so little to do on the Scoob lately that I have almost willed something to go horribly wrong. And it has. The MAF [Mass Air-Flow] sensor, which sits just behind the air-filter and gauges the amount of air coming in to the engine so it can prepare the right amount of fuel, looks like its thrown its hand in suddenly and for no good reason. Its a notoriously hard to come by part too and the worst bit is my baby is off the road until its fixed. Oh well, I was hoping when I did get working on the car it would be to upgrade it, but hey ho :)

FAULT FINDING:
The car started juddering on Monday morning at about 2500 revs so I let it warm up and it was fine so I put it down to the cold weather, but the judder has continued to get worse. When the turbo was kicking in the engine was going to pieces. Once the car was warm though and I managed to get past the rev barrier, the turbo was running fine.

I asked around on ScoobyNet and everyone suggested the MAF sensor, but to know for sure I'd need to plug-in and read the fault-code. I don't have a diagnostics-setup to hand myself, but I was amazed to find that Subaru have a built-in workaround for the layman. Under the steering-column, behind the dash, are a couple of black wire-connectors. When they're plugged together and the ignition is turned on the Check Engine light will flash a sequence like morse code. The series of long and short flashes corresponds to an error-code - a seriously cool bit of gadgetry that! I got 2 long and 3 short flashes, which is a code 23 and, of course, the MAF-unit. http://www.scoobypedia.co.uk/index.p...odeDefinitions

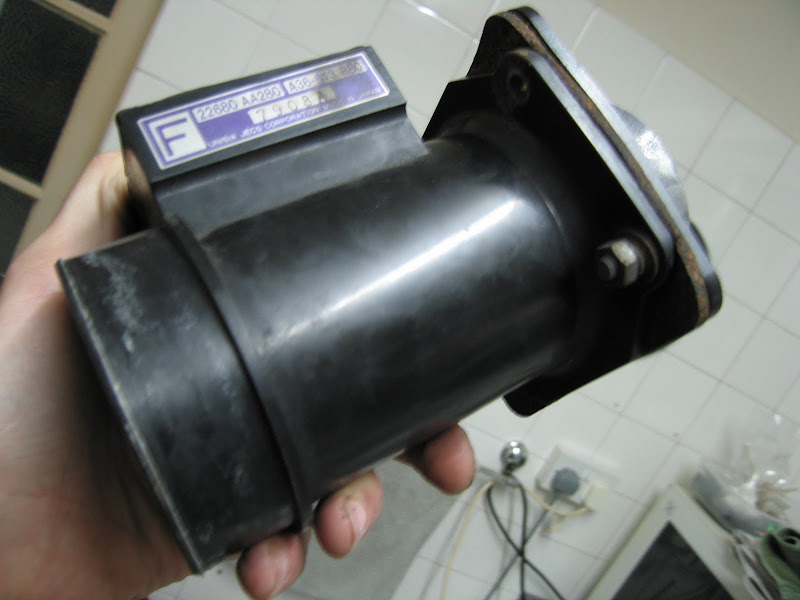
At the time that sounded great because I was fearing a blown head-gasket again, but its turning out to be a right bugger to get hold of. There are quite a few types of MAF-unit for the varied Imprezas and you have to get the right one. Each model variant has a corresponding coloured label on the MAF and most people were telling me to buy an Orange one so I had to get mine off to see.


Lucky I checked as it turned to be a purple one! I'd found someone with an Orange one to sell me for £70, but it looks like the Purple is a more elusive chap. ImportCarParts do have a few brand new Subaru's own Purple label MAFs in stock, but you pay for the convenience at £289!!

I've made my plight known on ScoobyNet and it seems the purple MAFs are popping up often enough so we'll have to wait and see what comes up because I just can't afford to shell out another 3 ton on repairs this close to Xmas.

*UPDATE!* 6/11/10 - I have obtained a purple-label MAF unit and it seems to have done the trick thank heavens! Info + How-To is in this post - MAF Sensor Fixed! Phew!
 
ScoobyLab + Propjam 2010/11