<-CLICK HERE FOR SCOOBY TECH. POSTS ONLY! CLICK HERE FOR GRAN TURISMO POSTS ONLY!->
1998 Impreza Turbo Project Car + Expanding WRX Knowledge Base!

Sunday, 28 November 2010

Wing-Mirror Fixed!!

The wing-mirror had obviously been knocked off at some point in the past and it was held on a by a massive wrap of strong tape that looked ghastly. I recently decided to replace that with nicer looking black-tape, but it just wasn't up to the job. Rather than chuck loads more tape on I decided it was time to just bite the bullet and fix it as I can't lacquer the car this weekend.


The metal mount has sheared clean off, but there's no damage at all to the wing-mirror casing and the electric swivel still works so it seemed a bit of a waste to buy a whole new unit [starting at about £30 on eBay for a used one] when there's probably a way to fix it. The metal mount is only alloy so I figured it wouldn't be hard to drill a hole in both parts and get a bolt through. There's plenty room in the casing to hide the bolt and for a real tidy touch I drilled through one of the existing screw-holes on the door-mount so the bolt-head is also hidden away, which also made drilling a lot easier. The screws only hold the plastic-casing onto the mount and there are 3, so I think I can afford to lose one.


Hiding the bolt-head means the work I've done is invisible, but I had to use a 4mm bolt to fit the head up into the existing screw-hole. Even a slim steel bolt won't snap easily, but I would have liked to use a fatter one just to reinforce against those wheelie-bin knocks as it can't swivel inwards, but it couldn't with the black-tape anyway so I'll have to carry on being careful. I was beginning to think the job was suspiciously easy when I hit my first snag - tightening the bolt without the nut spinning around. To do this I had to remove the mirror-glass and motor-bezel to make a small gap to slide a spanner through and grip the nut. The plastic around the nut was still very constricting and the spanner had to be poised perfectly on the edges of the nut to get a few turns before it gave and had to be repositioned, which was frustrating but I got there in the end so money well saved.


As you can see from the ice on the windscreen my fingers were numb and blue but I think it was worth it to finish both this and the spotlamp in one weekend. It may not swivel or be as sturdy as a replacement, but its just as good as the black-tape and the mirror looks positively brand-new, so if it lasts me for as long as I have the car then result!

Saturday, 27 November 2010

New Spot-Lamp Sorted!!

Wow, the weather really has turned bitterly cold this week and spray-work is out of the question. I think that to get the lacquer on before xmas now will need somewhere indoors to do it, but I did find a real spot-light this week to replace the fake one so, even though my fingers were numb and purple I just had to get it on. After all, we might have fog again tomorrow...

A while ago I got hold of a replacement front-bumper from a mint import car and luckily it holds the bracket I needed for my missing spot-lamp, which made finding the new one much easier. I will be replacing the whole damage-repaired bumper eventually, but the new one is black so I'll have to get it painted first, its a bit too big a spray job for me I reckon.

The spot-lights haven't been cheap on eBay lately, with a few on for £40+ and loads of pairs starting at £70. The lenses have Subaru etched along the bottom and the back of the lamp is angled, so you can't switch sides and have to rely on finding the one you need. I spotted a near-side one for £30 delivered from smr-subaru and thought what the hell. It took a week to arrive, but its in great condition [much better than my current one] and has a blue/rainbow type halogen bulb in it, which is nice, although I'll have to buy a matching one for the other side!


FITTING:

All 3 of the bolt-holes in the old bracket had broken off studs in them so the whole thing had to be replaced, but luckily the bracket just slides down off hooks and can be lifted out without removing the bumper. It slides out between the gap in the bumper corner so the under-tray doesn't even need to come off. The old wiring socket for the spotty has been hanging loose next to the wheel-well, so I gave it a good clean out with brake-cleaner and electrical solvent before plugging in and testing. The new bracket is off an import too and as you can see from the pic its in great condition with perfect threads so I bolted the new lamp in place with 3 more of those trusty alloy allen-bolts from the skip at work. The top-right bolt also holds the corner-indicator in place again, which is great as its been held on with a giant ball of ally-tape sincebefore I bought the car. I'm chuffed to bits to have this boxed off at last, the car is starting to look a lot less ratty - just gotta fix that broken wing-mirror and the body is complete!!

Saturday, 20 November 2010

N/S/R Wheel-arch Touch-Up

There's always been a few bubbles in the paintwork just behind the near-side rear wheel-arch, but they have grown a little bit over the year. Last week I pressed the blisters a bit and dirty water dribbled out so I decided it was best to act on the corrosion fast before the worst of the weather hits. I really should lacquer the work I did in June on the off-side rear wheel-arch when I finish this side off too, it shouldn't have been left so long - the paint is holding up so far, but best not to chance it with frost round the corner.

I started by carefully breaking the bubbled paint off with a sharp knife. The paint and primer had bubbled clean off the metal panel and was quite tough to break off still, but a few weak spots were obviously letting nasties in and there was just a little rust beginning under the lip at the bottom. Luckily the panel itself was holding up pretty well and wasn't showing any signs of actual rust, but there was lots of black pitting that went down quite deep into the surface.

I then rubbed down the area about an inch around the corrosion with 140-grit paper to get rid of the paint. The black pitting was a different story and it took quite a bit of rubbing with emery-cloth to get down the clean metal. I was still left with a few deep craters, so I managed to eek out one last mix from my tube of P38 filler and did a thin skim over the whole area to make sure even the smallest pits were filled, before sanding it flush to the metal. I then threw on a quick coat of zinc-primer and sanded it flush with some 600-grit Wet/Dry paper soaked in slightly soapy water, so I don't get panty-lines in the paint. I did start spraying the silver-coat on Sunday, but got a bit over-zealous and the paint ran something awful. Its back to work I go too, so I'll have to give it a quick rub down and finish the silver-coat next weekend, as well as lacquering this and the other wheel-arch - lets get some closure on the spray-work!!

More detailed descriptions of the rubbing, filling and painting processes can be found in the previous posts Painting the Bonnet Lip and Re-Inventing the Wheelarch Pt. I.


Saturday, 6 November 2010

Return of the MAF!! - Sensor Replaced!

It's less than a week since the car died and I've managed to get her up and running again, thanks mainly to a lot of help from the ScoobyNet massive. I really thought it was curtains this time - the car just seemed so poorly on Tuesday, coughing, spluttering and idling so crazily - all the signs of a generally broken engine and I would have never have known where to start diagnosing it without all the help and advice from the forum and its free - diagnostics are renowned for running up huge bills at garages, so the Scooby community really is worth its weight in gold.

With the mechanics at work all pointing to a broken head-gasket, I nearly started the horrible job of ripping the engine apart, but now I've discovered the black-socket trick for reading your own fault-codes, [which I will have to cover properly in its own post soon - I've never seen anything so trick!] I know I won't be needing dodgy opinions in the future. Much better to get info from people who know their Scoobys inside out!

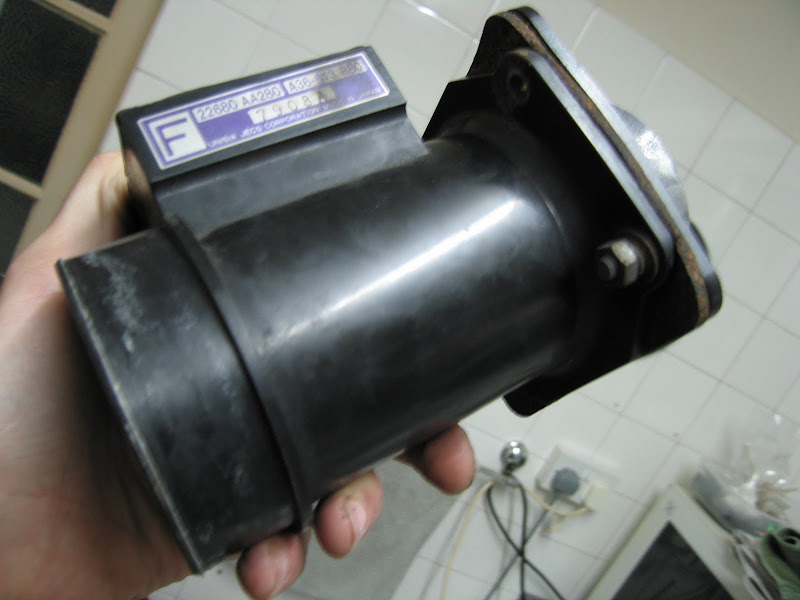
By Friday I'd got in touch with a lad on eBay called BigEd4244 who had a couple of Purple MAFs for sale, and asked me to make him a serious offer. I said £70 and he messaged back to say he'd take £90 and send the unit next-day delivery, so I agreed and sure enough the MAF was waiting for me when I got home on Saturday. Fantastic, helpful service! A new one of these would set me back £289, so mine would have been literally cheap at twice the price.


Fitting it couldn't be easier. It's held in place by one of the bolts that hold the top-hat adaptor for the air-filter, which is fine if you have a cone like me, but getting the bulky, standard air-box off is a bit more involved, so check page 2-7 [W1A1] in the Subaru Workshop manual [download here] if you do have the latter. This process is the same for all Classics after MY97.

PROCESS:

1. Disconnect the battery earth-terminal.

2. Unplug the wiring-socket from the near-side of the MAF-unit by depressing the clip and sliding it out.

3. Remove the air-filter by undoing the jubilee-clip with a screwdriver.

4. Remove the four bolts holding the top-hat adaptor for the filter onto the MAF-unit using a 10mm wrench.

5. Undo the jubilee-clip holding the MAF-unit to the turbo-inlet hose and gently lever the MAF-unit down into the gap below until it breaks free of the rubber-hose.

6. Wipe around the mouth of the rubber-hose and the terminals on the MAF wiring-socket and reverse the previous 5 steps to install the new MAF-unit.

I am now reveling in smooth-running bliss. The engine feels so content through the rev-range now that I can't help wondering if the MAF-sensor has been on its way out for a while, becoming more and more noticeable with the cooler weather. I'm well annoyed that this £90 couldn't have been spent on improving the car elsewhere, but I guess keeping it on the road comes first. Cars eh?

Wednesday, 3 November 2010

MAF Sensor Trouble, Car Dead!

Oh my days, I've had so little to do on the Scoob lately that I have almost willed something to go horribly wrong. And it has. The MAF [Mass Air-Flow] sensor, which sits just behind the air-filter and gauges the amount of air coming in to the engine so it can prepare the right amount of fuel, looks like its thrown its hand in suddenly and for no good reason. Its a notoriously hard to come by part too and the worst bit is my baby is off the road until its fixed. Oh well, I was hoping when I did get working on the car it would be to upgrade it, but hey ho :)

FAULT FINDING:
The car started juddering on Monday morning at about 2500 revs so I let it warm up and it was fine so I put it down to the cold weather, but the judder has continued to get worse. When the turbo was kicking in the engine was going to pieces. Once the car was warm though and I managed to get past the rev barrier, the turbo was running fine.

I asked around on ScoobyNet and everyone suggested the MAF sensor, but to know for sure I'd need to plug-in and read the fault-code. I don't have a diagnostics-setup to hand myself, but I was amazed to find that Subaru have a built-in workaround for the layman. Under the steering-column, behind the dash, are a couple of black wire-connectors. When they're plugged together and the ignition is turned on the Check Engine light will flash a sequence like morse code. The series of long and short flashes corresponds to an error-code - a seriously cool bit of gadgetry that! I got 2 long and 3 short flashes, which is a code 23 and, of course, the MAF-unit. http://www.scoobypedia.co.uk/index.p...odeDefinitions

At the time that sounded great because I was fearing a blown head-gasket again, but its turning out to be a right bugger to get hold of. There are quite a few types of MAF-unit for the varied Imprezas and you have to get the right one. Each model variant has a corresponding coloured label on the MAF and most people were telling me to buy an Orange one so I had to get mine off to see.


Lucky I checked as it turned to be a purple one! I'd found someone with an Orange one to sell me for £70, but it looks like the Purple is a more elusive chap. ImportCarParts do have a few brand new Subaru's own Purple label MAFs in stock, but you pay for the convenience at £289!!

I've made my plight known on ScoobyNet and it seems the purple MAFs are popping up often enough so we'll have to wait and see what comes up because I just can't afford to shell out another 3 ton on repairs this close to Xmas.

*UPDATE!* 6/11/10 - I have obtained a purple-label MAF unit and it seems to have done the trick thank heavens! Info + How-To is in this post - MAF Sensor Fixed! Phew!

Sunday, 31 October 2010

Tyre Puncture Repair

A couple of months ago my dad spotted a screw in my n/s front tyre [why is it dads are so gifted at spotting stuff like that?! I bet he put it there!], but the tyre hadn't lost air so I soldiered on. Several weeks ago I checked the pressure again and it was down to about 15psi so I re-inflated it to 30psi and checked again a week later. The pressure had only dropped a few psi over the week, but I decided to act on it this weekend, rather than just keep on pumping it up.

A mate of mine recently had a tyre on his Vectra repaired for just £5 at a small tyre-centre in Wallasey, near where I work. I doubt I'd find time on my lunch break to get it done and its a 7 mile drive for me otherwise, so I decided to head to good old National where I bought the tyres as its only round the corner, although I didn't realise I'd end up paying nearly 4 times as much.

National did a repair on my dad's A4 estate not 2 years ago for a tenner, but today it set me back a cool £17.50 - Ouch! At least the tyre is fixed and to be fair to National they have 3 branches within 3 miles of where I live and the last few times I've been the service has been very quick - I had my Scooby keys back today in 10 minutes flat, so I guess you get what you pay for. http://www.national.co.uk

Saturday, 30 October 2010

General Update + Insurance

Dismayingly there's just nothing new in Scoob world lately. Life is being an expensive ride at the moment and the colder weather makes it too daunting to do any serious mechanical work or painting of the underside, which I wanted to do before winter really. The car is also running brilliantly at the moment so there's nothing thats screaming out to be done. I have managed to sort out a few small, but niggly, faults though and re-insured the car without paying the astronomical amount Elephant wanted for my renewal...

INSURANCE:
I'd already paid for a year on my Beemer at just shy of £400 a few months before the Scooby arrived, so Elephant.co.uk agreed to change my policy over to the Subaru for the same amount again, making the premium total £804. When I received my renewal quote this year though they wanted £1145, nearly another 4 ton more again! I rang them saying I'd found a cheaper quote as I have done before and asked them to get the price down a bit, but they were having none of it this time and could only get it down to £999. I've been with Elephant for 5 years and I like the yellow envelopes you know, but they didn't even seem bothered about keeping my custom so I hit up CompareTheMarket.com again and got a very nice quote of £714 from a new upstart company called 1st Central, which, for fully-comp, with a 27 yr-old driver on a Group 17 car, is very, very good. The customer reviews for 1st Central are a mixed bag - they're not very nice if you crash and it's your fault apparently, especially if you were drunk [duhhh!] - but I thought for that saving it couldn't hurt to try them so lets see how we get on!

BOOT-LEAK:
During the incredible bout of wet-weather we had earlier in the month I noticed a damp patch of carpet in the boot-install. I took out the spare-wheel to find a small paddling-pool in the wheel-well. At first we thought it was coming through the boot-lid seal so I began taping sections up to track the leak with no success. After a couple of scans round the forums though I discovered its a common problem with after-market lights, like my Morette LED ones, where they haven't been bolted in tight enough. I'd only checked that the bolts were finger-tight before and when I got a spanner on them I found that they were all pitifully loose and took some turns to get them graunched. I should have clocked onto this much earlier as its becoming clear that the lad who bolted all these parts on before my time was a bit of an animal, with his roof-scoop held on with bathroom sealant and whatnot. Anyway, the wet weather has now returned, but I'm glad to say the leak hasn't and the spare-wheel well is now dry as a bone. Piece of cake!

LOOSE FRONT SIDE-LIGHT CLUSTER:
I replaced the n/s bulb and snapped the plastic-bracket that holds the top of the corner-cluster in place while screwing it in. Ever since then the cluster has wobbled about and often needs pushing back into place. There isn't much to stick tape on to so I've just left it for months, but with nothing better to do on the car I've painstakingly drilled a hole through the back of light-lens itself to provide somewhere to get a cable-tie through to hold it in and its now as sturdy as the other bolted side - you'd never know.


Saturday, 16 October 2010

Fixing the Subwoofers

FINALLY! After four months I've discovered what was making my subs work so strangely! This is definitely worth noting as it is likely a very common problem and could stop you needing to replace your subs/amp if you have the same symptoms.

FAULT FINDING:
I took the system out of the boot while fitting the coilovers and when I put them back in they were almost inaudible. Everything appeared to be working so I fiddled with the settings on the head-unit for a few days, but they were so quiet I didn't even notice the fuse had blown at some point. I replaced it, but they kept on blowing after a few days so I checked all the wiring for splits where the metal could be touching the car somewhere. They were all fine.I thought itcould be an earth problem, but if the black cable isn't grounded properly then the amp wouldn't turn on at all. I then checked and re-checked the remote cable from the head-unit to the amp, as this was a horrible problem I had with the system in my Escort, but it all just looked hunky dory. The speakers were moving too, wildly back and forth from one extreme to another, so they were definitely getting a signal.

As for the sound, most of my passengers were convinced I was losing my mind, as the Infinity Kappa's in the doors are pretty bass heavy as is, and kept telling me nothing was wrong. After a couple of busy months though, lugging round a small person's weight of subs and replacing fuses every 5 minutes, I just had to get to the bottom of the quiet running or get rid of the install altogether.

I'd checked and re-checked everything, so the problem had to be inside the components themselves. If a circuit had gone somewhere in the amp then I'd have to buy a new one, but luckily [i guess] the problem was inside the sub box. I guess it must have been stored somewhere damp before I bought it, plus the Scoob's boot and my porch probably weren't much better, because the wiring on the back of the speaker-terminals had started to really corrode in some way. I don't know if you can quite see in the photo, but it's a white powdery crud that covered the brass terminals and was starting to move up the copper cable inside the plastic sheath. I only know of aluminium corroding in this way, never copper, brass or gold-plated bits, so I suppose it might have been some alloy in the solder[?] It was the joins that held the worst of it and when I was checking one wire the crumbly solder broke straight off. Idon't know how the difference between these corroded wires working and breaking was sosudden, because it looks like they've been rotting for a while, but at least it's an easy fix and peace of mind at last!


FIX:
I cut the cables off a good cm past the end of the corrosion, stripped the ends and, instead of soldering them back on, I crimped on some new gold-plated spade-sockets, £3.99 at Halfords, but at least I know this won't happen again. I then took the brass spade-connectors off the terminal, burned the solder off them on the cooker and gave them a good rub with emery, before wiping any trace of the corrosion off everything. I hooked up the new spades and wrapped them in a nice piece of heat-shrink. As soon as I turned the head-unit on the bass was back! YES!

Sunday, 10 October 2010

Bolting down the Passenger Footrest

The alloy-plate in the passenger-footwell has become an annoyance as people always seem to find a way to kick it around and wedge it under the seat so its time to fix it in place. I've been hesitating because I'm reluctant to start drilling holes and screwing through the cabin-floor in case I hit something like wiring or a fuel-line, but it turns out that floor carries on flat to the engine-firewall and the bit the slopes up for the footrest is just a thin steel false-floor.

I think it's worth noting in case I decide to remove the heavy false-floor later and completely replace it with my slimline alloy job when I decide to get the weight down. It's only held in place by 4 bolts and I don't think it stiffens the body enough for the softer metal not to work just as well. For now though I've just plonked the alloy over the top. I took one bolt out from each side of the false-floor and fixed down the alloy-plate through the existing holes with 2 more allen-head alloy bolts. I countersunk the holes in the alloy-plate, but the heads are quite deep so they only fit flush to the bumps not the plate itself.

Saturday, 9 October 2010

360° Spirit-Level in Engine Bay

The skip at work really has yielded some great items to fab-up car parts from, as well things like lightweight-alloy bolts [just like the ones available from Demon Tweeks, £5.99 for 5!] to build them with. This trick multi-directional spirit-level was no exception - it's basically a circular spirit-level with a ring in the centre so the bubble is level in every direction. I couldn't see it thrown away, so I've fixed it in place next to the intercooler to add a neat little instrument to the engine-bay...

It's handy to have for finding some level ground to check oil/fluid levels properly or work on the car, but most importantly it's ideal for making sure each of the four coilover-shocks are set at the same levels for balancing the car's suspension! In theory it should work a charm, so I'll have to get the front two TEIN shocks on asap... I know I keep saying this.

I found a nice place for it on the right intercooler-bracket, got the car on a flat piece of ground and, with the help of a normal spirit-level, found the right angle to mount it level. It's set in an aluminium-bracket so I had space to put a small self-tapping screw through it into the intercooler-bracket. I finished with lashings of ally-tape to stop it from tilting, as even the slightest movement will misalign the bubble.

I'll have to re-calibrate the position of the spirit-level again when I get the front coilovers on and all four corners will need to be set to the absolute bottom so the car is completely flat, but it'll make it so much easier to get the balance right when lifting the car later! Techy!

Wednesday, 6 October 2010

Update + BMW M1 'Art Car' Birthday Cake!!

Where has the year gone?! It's rolled round to October already, but at least that means it's my birthday!!

I've finally got a whole two weeks off work, but I've been on holiday in the Scilly Isles for a bit [where there are no Scoobys sadly] and too busy partying to focus much on the car. I have found time to iron out a few small problems that have been doing my head in, like the faulty subs, and neatened up some of the detailing [which I'll cover soon], but I still haven't motivated myself to finish off my carbon wind-diffuser and anything else exciting will mean spending money - and that ugly old thing called insurance is about to rear it's head in a couple of weeks so I'll have to get saving hard again and see what I can achieve before Xmas hits...

For now enjoy this birthday cake that my good friend Chidge made for me. OK, so it's not shaped like a WRX, but it is a rather spectacular rendition of the awesome BMW M1 supercar from the late 70's. The more astute among you will notice that its not just any M1, but is in fact the famous 'Art Car', with the paint-job done by Andy Warhol himself for one of his exhibitions [http://www.bmwdrives.com/artcars/bmw-artcars-warhol.php]. A brilliant car-geek-cake and a very thoughtful birthday gift!!


Can't even tell which is which!!

Monday, 27 September 2010

Painting the PAS-Fluid Cooler + stuff

While I had the radiator out I noticed that the cooler for the power-steering fluid was a bit rusty. This is basically a pipe that runs along the front of the radiator, catching the incoming air and cooling the fluid inside, but its obviously caught its fair share of salty crud over the years too.

The pipe is still sound and the cooler still works of course, but I thought it best to give it some fresh protection while I had the chance. I scraped off all the surface rust, gave it a good rub down with emery-cloth and wiped it off with a damp cloth. I then gave it a good, thick coat of black Hammerite. Shame about the hammered finish, I'm sure I had some black Smootherite lying round, but its high-heat resistant none the less and looks a damn sight better.


While I was at it I thought I'd spruce up the battery tie-down as well and finished it off with two nice, shiny new nuts. Every little helps!

Sunday, 26 September 2010

New Koyo Alloy Radiator

FAULT FINDING:
I check the coolant level reasonably regularly, but one night the temperature-gauge went upslightly over the norm and after a while kept on rising so I banged the heaters on full blast and managed to limp the car about 2 miles home. Next day I discovered that the coolant had nigh-on disappeared! I filled the system back up with water - it took about 5 litres - to check for system failure and ran the car fortheweek,butthewater level stayed up and no sign of a leak. With no obvious evidence of failure my dad immediately suggested the head-gasket was blown and the coolant must have slowly gone through into the cylinders :( The mechanics at work backed up his claim and said that, because of the boxer-engine with a cylinder-head down either side, it was a nightmare job that needed the lump lifting out to do. I reckon I could do it without lifting the engine, but it would involve removing almost every other item from the engine bay. Rather that though than forking out for a professional to do it - I shudder to think how much that would cost. This could have been a killer blow for the Scoob, but all the other symptoms of a blown head weren't there - no oil in the water, mayonnaise in the oil, loss of power or rough-running.

At this point, with the levels staying up in the header-tank, I had to add coolant to the system to stop it rusting up, so I drained the water out, flushed it out with more water to get rid of any floating crud and re-filled it with a half and half mix of water and 3L of Halford's Advanced engine-coolant, which wasn't cheap at £24 (£7.99 per litre). I then checked the header-tank daily for a week with no change in the level.

Another two weeks of harder driving went by and I checked the coolant again. This time there was a definite drop in the level - the tank was only about a quarter full so I'd definitely hit a problem. Now I spotted the radiator. Its always looked battered but showed no signs of being split - I guess the old leaking coolant couldn't be seen as well as the fresh bright-pink stuff. By the look of the pink patches though, the radiator had burst in three places so it had to be replaced asap and I didn't know whether to be gutted over this or elated that it wasn't the head gasket...

NEW RADIATOR:
I had intended to put an all-alloy racing radiator on at some point, but these cost £130-£300 so to fit one now would kill my chances of buying brakes and stuff any time soon and I've got to move forward with the car. The OEM-spec radiators are all-alloy themselves [although not as chunky obviously and in a mild-steel surround] and less than half the price so it was a no brainer really to get the leak fixed. I scored one for £50 including next-day delivery off a guy called [dilley3613] on eBay - laughing. It's no cheap Chinese piece either, this is made by Koyo in Japan and, although its not quite as sturdy as the original one, its still looks a decent-quality part.

Fitting it was not a hard job at all. You only need a couple of spanners and there's not a lot to undo. There's plenty of space to work in a
nd the radiator lifts out clearly. Our only setback was the two bolts holding the radiator top-mounts were rusted so tight they snapped on the way out so we had to drill through and put a new bolt in with a nut underneath, which took ages. The top-mounts are all that hold the radiator on so check them for rust and WD40 them for about a week in advance to try and avoid the hassle.

PROCESS:

REMOVAL:
1. Jack the car up and remove the front under-tray by the two 10mm bolts on either side and the two 12mm bolts front and back. Lower the car.

2. Remove the radiat
or/header-tank cap to release pressure from the cooling-system.

3. Drain the cooling-system by placing a plastic-tube over the spout of the drain-valve at the bottom left of the back of the radiator and opening the valve. Drain into a clean bucket if you're re-using the coolant as I did and cover it straight afterwards.

4. Disconnect the fan wiring-socket by sliding a screwdriver down the slot in the connector until the two sides can be pulled apart.
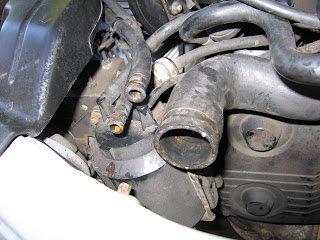
5. On MY97/98 model cars the overflow-pipe from the header-tank is a thin metal tube that runs along th
e top of the radiator - later models won't have this. Disconnect
the overflow pipe from the system by removing the finger-clips and sliding off the rubber-hoses at each end.

6. Disconnect the rubber-hose from the overflow pipe at the top-left of the r
adiator by removing the finger-clip and sliding it off.

7. Disconnect the two large hoses from the top-left and bottom-right of the radiator by opening up the jubilee-clips with a flat-screwdriver. They will be sealed on tight, but should wiggle off easily once the seal is broken by pushing against the edge gently with a screwdriv
er. [It's worth putting a tray underneath the lower hose when you disconnect it as there will be a bit of coolant still pooled down there.]

8. Remove the two 12mm bolts holding the radiator top-mounts in place and tilt them up out of the bushes on the radiator.

9. Now the radiator can be tilted back, remove the single 10mm nut holding the PAS-fluid cooler in place. This is the two pipes that run over the radiator and
down the front. There is no need to disconnect the hoses from the PAS-coole
r as it can be tilted well clear for the radiator to be lifted out.

10. Slowly lift out the radiator, working the lower-bushes clear of their mounts.

11. Separate the fan and overflow-pipe from the old radiator by removing the two 10mm bolts at the bottom of the fan and the three 10mm bolts along the pipe at the top of the radiator. Also remove the top and bottom rubber-bushes to be reused.

REFITTING:
12. Bolt the fan and overflow-pipe to the new radiator using a 10mm wrench and re-insert the top two rubber-bushes.

13. Replace the bottom bushes to their mounts on the chassis. [The pins on the radiator are easier to use as a guide than putting the soft bushes on first and having to force them in.]

14. Lower the new radiator into the engine-bay, pushing the guide-pins firmly into the bushes.

15. Bolt the PAS-fluid cooler back into place, with the pipes over the radiator, using a 10mm wrench.

16. Push the pin on each top-mount back down into the bushes on the top of the radiator and replace the two 12mm bolts.

17. Push the two large rubber-hoses onto the new radiator [a tiny bit of washing-up liquid might help] and tightly secure them with the jubilee clips.

18. Push the rubber-hoses back onto the overflow at the top-left of the radiator and either end of the header-tank overflow-pipe. Replace the finger-clips.

19. Refill the system with 6.5 litres of a half water/half coolant mixture using the spout next to the battery or the header-tank and letting it run through.

20. Replace the header-tank cap and the front under-tray. You're done!

Tuesday, 21 September 2010

Carbon Fibre - Rear Wind-Diffuser - Part I

With the mould looking pretty good it was time to look at the different types of carbon-fibre covering to wrap it in. There are dozens of stick-on imitation carbon sheets available, but I didn't want it to look fake even under close inspection so I had to go for real stuff. I've seen people making real carbon parts for ages and it doesn't look too hard, but the price of it used to be outrageous. Not any more it seems, as I've found sheets of all sizes of raw carbon-fibre on eBay, often being cheaper than vinyl stick-on sheets of the same size! My diffuser is about 60cmx40cm and I didn't want to worry about matching the weave up with separate sheets, so I went for a half square-metre to cover it in one go, which worked out at £19.50 delivered for 100% twill-weave carbon, whereas the 3M-vinyl sheet that contains no carbon at all [but does look a LOT like it] was £27.99 delivered - nearly a tenner more expensive! Needless to say I went for the real carbon - from a firm called [grp_supplies], unfortunately no longer trading under that name and I can't find the new one on eBay :(

OK, so I had to buy some clear epoxy-resin to set the real fibre as well and it turned out to be dearer than I imagined. I could only find small tubes of the stuff for less than ten quid, but the amounts [and the cost] jumped up massively after that. I needed quite a bit for the diffuser too, so I grabbed the best deal I could find - 1kg of resin and 0.5kg of hardener for £28 delivered, which was good value even though they arrived in unmarked and unsealed bottles. They work great though - from a firm on eBay called [CreativeResinSolutions].

I originally intended to just cover the stiff plastic mould and re-fit it, but the carbon provides its own stiffness so the weight of the tough plastic van-undertray just seemed unnecessary. The thick plastic must weigh a couple of kg on its own so even the spaceship-light carbon would be a useless increase and the back end is already well planted with that soundsystem...

This meant I had to get the carbon off the plastic after it had set, which turned out to be stupidly simple. A professional would, of course, produce a fibre-glass cast of the part and use it as an inward-mould for the carbon. Not only would this mean forking out more money, I'd also have to completely re-design the fins on my diffuser so, with the carbon already there, I thought of a workaround, which I'm sure would be howled at by any respectable composite-engineer, but here is how I prepared the mould - after a few tests on a small dash-panel [here] I found this to be the easiest way of quickly fabbing up my carbon part :

PROCESS:

1. Smear the part in a thin film of vaseline. Apply a layer of cling-film to the part, sticking it in place with the vaseline. Repeat the process for several layers of cling-film.

2. Mix a good chunk of 2 parts epoxy resin with 1 part hardener and wait about 15 mins. until it starts to go tacky.

3. Paint a thin layer of the epoxy over the cling-filmed part.

4. Slowly drape the carbon-fibre sheet over the part and press it into shape. The tacky resin should make it easier to hold things in place. Tightly fold the fibre over the edges of the part and tape them in place on the back.

5. Mix some more epoxy-resin and immediately paint a good thick coat over the part, leaving it to dry for at least 8 hours.

**The part should pop easily off the mould by this point once the edges are trimmed and most of the cling-film can be peeled off. You can keep them together until the part is finished, but there is probably a higher chance of it bonding to the mould.


6. Give the part a quick sand with some rough paper. Remove any sharp points, resin drips and bumps. Don't worry about making the surface too even yet, but try not to go down into the carbon.

7. Mix more resin and apply another thick coat to the part, leaving it to dry for at least 24 hours this time. [One nice, thick coat should do it, but repeat process 6 & 7 if it looks too thin or uneven.]


8. Sand the part down to an even[ish] coat, then use finer grade papers to give it a smooth surface and apply the finishing touch to best show off the weave - either a coat of normal car spray-lacquer for the wet-look, or using T-cut / rubbing-compound to buff it to a dull racing-car shine.

As you can see I only got as far as the final coat. I've rubbed it down a bit, but still haven't found time to finish it, so I'll have to cover that in another post.

All things considered though, not a bad try for a beginner! It certainly looks the part - the carbon weave looks very authentic, but the dodgy moulding technique does have it's pitfalls. The heat of the epoxy drying causes bubbles in the cling-film to expand, which doesn't affect flat areas, but has made the back-edge of the diffuser a little sloppy round the fins, although it has given the skinny fins a nice rounded profile. A pro-diffuser would cost most of a grand remember, so for about £20 and a couple of afternoons work I think its turned out superbly! We'll have to wait and see if its a go when its finished and fitted.

Friday, 17 September 2010

Carbon Fibre - Making the Mould

Right its really time I wrote up some of the carbon fibre stuff because I'm desperate to move on to things like the brakes. The whole carbon idea started when I found an old plastic-undertray from a modern Ford Transit van at work. I thought it could help to fix where my front-undertray has snapped, but as I examined it I could see potential in the chunky design for greater things...

Rear Wind-Diffusers [like the one on the right] are common on race cars and are basically just a flat tray beneath the rear bumper with down-pointed fins for the air to flow past and give the car more downforce. They are almost exclusively made of all carbon-fibre and that means they aren't cheap either - any I can find for the Impreza start at £700 and go up, so considering they would have no real use for road driving except the style factor, they are out of reach of any sane modder.

Looking at this plastic Ford Transit undertray though I could see the beginnings of my own custom-built imitation diffuser, so I cut it into a flat piece and taped it under my back bumper. Its not quite as wide as I would have liked, but the edges do fit nicely within the number plate recess, so I thought what the hell, it can't hurt to have a crack at it.


With the main piece fitting OK and looking promising, I cut four equal sized fins from the off-cuts and just superglued them into place along the bottom of the tray, which conveniently has four vertical lines along it as a guide. I figured that whatever type of carbon wrapping I used later on would hold them in place properly and besides, this thing was never going to be an aerodynamic aid, so I'm not too bothered about structural integrity as long as it looks the part.


Its definately got that diffuser feel and I can't see it making the aero-dynamics of the car any worse [provided the leading edge is flush to the bottom of the car so it doesn't turn into an air-brake, of course!], so I decided to swot up on my carbon-fibre coverings...
 
ScoobyLab + Propjam 2010/11