


Saturday, 26 June 2010
Cost Analysis: What's the damage so far?!
OK, so you're probably thinking I've spent quite a lot on this chariot in 4 short months... so heres a cost breakdown of every little thing I've bought so far, in a delightful table format.

Monday, 21 June 2010
Sparco Carbon-Fibre Pedals!
With the serious MOT work out of the way it's time to throw on some more tacky parts, starting with these ultra-light, 100% carbon-fibre racing pedals from Sparco. I've always wanted a set of these range-topping pedals, but figured £55 was a bit much. Luckily I tracked down an unused set on eBay for just £24 delivered - win.


There's one small catch though, the set only comes with 8 of the 12 nuts+bolts and one of the stick-on grips is missing. Oh well, I doubt I'l be using the grip tape anyway [it'd ruin the look!] and I got away with just using 2 bolts for each pedal [for maximum weight-reduction, obviously] so I've 2 spare anyway.
Its clear to see why these are for motorsport use only - form definitely follows function here. I've always thought the teutonic carbon look is fantastic, but the finish of the lettering, screw-holes and the entire back surface is pretty poor. I guess these aren't a styling piece then, but the real beauty of the carbon is that they're ultra light, weighing less even than the rubber OEM pedal covers and are a fraction of the weight of Sparco's alloy-pedals [like on my BMW], which cost half as much. That's the difference and damn it feels good to be elitist!
As with all bolt-on pedal sets, these were a doddle to fit. My rubber-pads had already completely worn away so it wasn't hard to find somewhere for the 2 drill-holes on the steel pedal in the space either side of the lever itself. I'd planned to cut the long plastic accelerator pedal down a bit for the carbon pad, but its a tilting one, so I just managed to cover the whole thing with the Sparco and didn't bother - it interferes with the brake pedal though unfortunately. I thought I had the clutch pedal bang on too, but its a bit close to the footrest on the left so I can't quite squeeze my foot down to it - this might be in need of a quick move to the right.
Sunday, 20 June 2010
MOT Pass!!
 By the time I got back to Seaview motors it was a couple of days too late to get the re-test for free, so I had to fork out another £40 quid, but he very kindly agreed to only do the partial test and check only what the car had failed on anyway. The current MOT still didn't expire for another 6 days, but it turns out I don't lose any of it as this latest certificate is valid from the day of the test, but runs until a year from the current end date [16th June 10 - 22nd June 11] - very nice.
First up was the emissions, with the car recording less than half the original CO2 figures just from the addition of a sports-cat, [although I'm sure the oil/filter change played it's part too]. The guy also reckoned the exhaust had dropped in volume sufficiently, so that was £235 well spent and this cat doesn't kill power so it can stay on.
We got the Scoob up on the ramps and I talked him through the mechanical work, then I jumped in and we did a quick check off all the lights, all things A ok. He did mention that the headlight beam had been lifted just enough, although both were still out of line and should be checked in future, but he didn't even prescribe any advisory notices, so excellent.
If I'd bought the standard shocks instead of the TEIN coilover setup then I would have got the car through for about £400 [or even <£300 if I found a used OEM exhaust]. As it stands I've spent about £900, but hey ho, progress is progress! The standard £115 shocks would have got me through the test, but compressing the old springs back on would have been more involved and the front shocks might need doing soon anyway. I also planned to lower the car at a later date, so thats out of the way too. Besides, doing all the work myself has saved me one hell of a packet and I have the great feeling that no ruthless mechanic has rattled the parts on :)
The true positive outcome of this MOT is that the car is rid of those dodgy discrepancies. It's obviously been pushed through some bent MOTs in the past, with no fog-lights or catalytic-converter, so it's good to know I've brought the car back into check for next year, or the next owner. Time to get back to the bodywork and buy a new front spotlight!
Wednesday, 16 June 2010
Prodrive [TSL] Sports-Cat - Emissions Sorted!
The last thing on my MOT list was the exhaust emissions, my total de-cat pipe was desperately in need of a catalytic-converter. A standard one would be £140 new and the right length to meet the joint on my Peco, but joining a pipe of less than 2 inches to a 2.5 inch big-bore would be an interesting challenge. I then found out the OEM system relies on 2 cats, doubling the price and forcing me to buy a whole new back section as the 2-piece Peco would have to be fully removed.
 on eBay for as little as £80, they just didn't seem to be everything I needed [from the back of the turbo, right to the tailpipe]. I'm not sure if the exhaust differs much from year to year on the WRX as most upgrade parts fit all classics, but some sets had both cats under the car, some had one cat on the downpipe and some had no downpipe at all. To guarantee the right fitment I turned to new exhaust suppliers, the cheapest quote being from Kwik-Fit @ £850!, so that was right out.


If I was going standard then I'd need a full system. The simplified design of the straight-through Peco replaces 4 OEM parts on my 98 model and tracking one down that looked as if it would fit was a pain. Although I could find used 'full systems'
on eBay for as little as £80, they just didn't seem to be everything I needed [from the back of the turbo, right to the tailpipe]. I'm not sure if the exhaust differs much from year to year on the WRX as most upgrade parts fit all classics, but some sets had both cats under the car, some had one cat on the downpipe and some had no downpipe at all. To guarantee the right fitment I turned to new exhaust suppliers, the cheapest quote being from Kwik-Fit @ £850!, so that was right out.I'd heard about sports-cats, which fit onto a big-bore system and replace both cats with a single concentrated one, but at around £250-300 they seemed too dear. With the price of an OEM system sky-rocketing though it now seemed like a good idea. The ones in my price range looked pretty naff though to be honest, but I stumbled on a second hand TSL one, highly recommended and used by Prodrive, which was a snip @ £235. Of course there's always the worry that a used cat off eBay might be wrecked, but the guy selling it was none other than scooby-leicester who supplied me with the fuel-filler pipe in April, so I figured it was worth the chance just to keep everything on the car top-notch.
The sports-cat is excellent. Not only did it more than half the emissions figures and pass the MOT, but it's reduced the noise a bit too and got rid of the racing-car crackle and the pops when letting off the gas, which is great news for my neighbors and passengers, even if the car has lost a wee bit of character. The engine seems to be ticking over much more smoothly and evenly too, there's less vibration in the cabin and there even seems to be a little increase in power at low-revs - the car seems peppier anyway and I'm finding myself pulling away in 2nd now at times when I would have reached for first. The only downside to the sports-cat seems to be a loss of power at high-revs. Where the car would scream the entire way up the rev band before, there's a feeling now like something is tugging on the power when you get right to the top. It's not a great loss, the car feels just as quick where it counts and it's a bit more useable day to day now and at least I still have the de-cat front pipe there, ready for trackdays...
FITTING: [This covers replacing the front-pipe of a big-bore system (de-cat to sports-cat or vice versa), although the standard front-pipe (1st cat) is very similar to fit.]
It wasn't a lot of work to fit the sports-cat, just undoing a handful of bolts and the pipe is a doddle to replace, provided you can safely get right underneath the car, as a few of the bolts are too hard to reach otherwise. The exhaust bolts are constantly heating and cooling and they shouldn't have seized on too tight, so the job should be over in 2 hours.
1. Lift the entire front of the car, but don't use axle-stands - you'll need to do some heavy bolt twisting right underneath the car and axle-stands just aren't sturdy enough with both front wheels off the ground. The wheels don't need to come off so use ramps if you have them. Be sure to get the handbrake well on and chock the rear-wheels front and back. [We have no ramps and drove the car onto a couple of large concrete-blocks, which worked really well and large wooden blocks would be just as good, but I wouldn't advise using house-bricks or breeze-blocks.]
2. Get the front under-tray off by removing the two 12mm bolts on the cross-member and front-lip, then the two 10mm bolts on either side.
On my 97/98 model, among others, the Lambda oxygen-sensor is located on the right side of the down-pipe collar, just behind the turbo.
3. Unplug the Lambda sensor from its wiring-connector, by inserting a slim flat-head screwdriver into the sleeve that runs along the bottom of the plastic-clip. Slide the screwdriver down the length of the sleeve until the connector-plug can be slid from the socket.
4. Unscrew the Lambda sensor from the front-pipe collar using a mm open-ended wrench.
5. Remove the 2 large bolts and the 3 guiding-stud nuts that run around the collar and fix the front-pipe to the back of the turbo, using a 14mm wrench [although one of our stud-nuts underneath was a 13mm fit, but I don't think this is standard]. The upper ones are easy enough to get to, though all but the bottom right one can still be accessed, just, from under the bonnet. That last nut can only be reached by lying flat under the car and reaching up into the engine, [quite scary if the nut is hard to budge at first]. The guiding-studs will hold the pipe up when you unfasten it from the centre-pipe so there's no need to leave any of the collar-bolts on to hold it.
6. Remove the 2 long bolts from the bracket that joins the front-pipe to the centre-pipe, halfway down the underside, using a 13mm wrench.
7. Remove the 13mm bolt from the pipe-bracket, just behind the front wheels. The front-pipe should now be free to lift off the studs on the turbo and out under the car.

8. Wipe off around the back of the turbo and the centre-pipe inlet, as well as each end of the new pipe. Give the metal gasket from the back of the turbo a good wipe, apply a little exhaust-sealant paste [we did, but not essential if your gasket is in good nick] and replace it.
9. Lift the new front-pipe up from underneath and replace it over the studs on the turbo. Re-insert the 2 top collar-bolts and tighten them enough so that the pipe moves up to align with the centre-pipe. The gap in the rigid cross-member is a tight fit, so the pipe is confusing to align without guiding it with the collar-bolts.
10. Seat the front-pipe into the centre-pipe and replace the two 13mm bolts onto the bracket. The big-bore system has a resin gasket so no need for sealant, but make sure the bolts are wound tight. Then replace the 13mm bolt to the hanging-bracket behind the front wheels.
11. Replace the 3 nuts onto the collar-studs on the turbo using a 14mm wrench and fully tighten them along with the 2 bolts at the top.
12. Give the Lambda-sensor a quick wipe and screw it back into it's hole on the collar of the new front-pipe using a mm wrench. Plug the sensor wiring-connector back into it's socket and you're done.
Saturday, 12 June 2010
TEIN Adjustable Coilover Suspension - Part I - Rear
Only one rear shock-absorber failed the MOT in the end, even though the guys at National said both were shot. I took their advice anyway and decided to replace the two. A pair of the OEM (Kayaba Racing) shocks was £115 from Camskill.co.uk, but before I could buy them a mate at work offered me a complete set of GMax racing coilovers his friend was selling for £200. A set of these would set me back £700 odd quid new, so I instantly accepted. The next day he informed his mate had already moved them on - that or he'd figured out how much they were really worth.
 myself to a setup - I've been dying to spend some money on the car after all... I didn't fancy the cheap-looking GMax though and I have said all along that I want to keep it as JDM as possible, so I did a bit of research and decided on an entry-level kit from Japan bad boys TEIN [http://www.tein.co.uk], who I've heard and read a lot of good things about - they are also very nicely made and look fantastic! Theyr'e pricey @ £650 [cheapest I could find off a guy called mjd128 on eBay], but you get what you pay for...

 to the hub. [We placed a thinner metal bar through the top hole to help get the coilover aligned, which made it easier to get the lower bolt in first.] Tighten the nuts using two spanners again until the brackets on the damper are clamped tight to the hub-mount.
I turned back to the OEM shocks, but my heart had been set on the coilovers and over the next week I slowly came to the conclusion I should treat
myself to a setup - I've been dying to spend some money on the car after all... I didn't fancy the cheap-looking GMax though and I have said all along that I want to keep it as JDM as possible, so I did a bit of research and decided on an entry-level kit from Japan bad boys TEIN [http://www.tein.co.uk], who I've heard and read a lot of good things about - they are also very nicely made and look fantastic! Theyr'e pricey @ £650 [cheapest I could find off a guy called mjd128 on eBay], but you get what you pay for...Coilovers are a serious suspension upgrade, replacing the entire spring/shock assembly with a much stiffer, sturdier damper unit, which is also lighter and more compact as well as, most importantly, being completely height adjustable, with the TEIN set we went for dropping the car from 5 - 50mm! [The set comes with two special spanners and it only takes a minute to raise or lower the damper with the wheel off.]
Fitting:
I had a mechanic from work lined up to fit the OEM shocks, but when it came to the coilovers I found a nice vid on Youtube of two Australian lads fitting them to a Ver.5 STi and it didn't look too hard. Because coilovers come as a complete spring/damper unit there's no need to compress the spring off or on so I decided to have a go myself. I guess Aussie weather preserves metalwork better than in Britain, because those nuts were really on there and it turned out to not exactly be a breeze, but my dad and I did manage to get the rear two on in a couple of afternoons.
The task itself isn't hard provided you have a few spanners and are willing to get your hands dirty, but you need to be prepared to use ingenuity, especially if you live somewhere with a climate like Britain, to get the old shocks off.
PROCEDURE [Rear Shocks Only]:
REMOVAL:
1. Remove the rear seat-squab, seat-back and parcel-shelf by first removing the two screws from the front edge of the rear seat-squab (at the footwell) using a 12mm wrench. Lift the squab and pull it forward out of the way. Remove the three screws at the base of the seat-back using a 12mm wrench, lift it vertically up off the hooks holding it in place and move it clear. Gently pull one side of the parcel-shelf out from under the plastic on the C-pillar and once it is free the shelf should work its way out pretty easily.
2. Remove the two rear seatbelt pulleys by unbolting them from their frames at the base of the C-pillar using a 14mm wrench [though I recommend a socket-set with a few inches reach] and carefully move them out of the way of the suspension turrets.
3. Lift the car and remove the corresponding rear wheel.
4. Slightly loosen the three 12mm nuts holding the top-mount of the shock-absorber to the suspension turret under the rear parcel-shelf so that they can be removed without too much tension later.
5. Remove the brake-hose from the bracket on the shock by turning the collar of the hose and moving it up slightly, which should loosen it enough to pull the thin, flat metal clip out and free the hose. [Our OEM shocks had no U-shaped bracket to slide the hose out of - it was just a closed circle, the hose must have been woven through the shock - so we had to make a cut from the side of the bracket to the hole with a hacksaw and bend it open with
grips to get the hose clear without disconnecting it.]
6. Using a 17mm wrench crack off the two large bolts holding the shock-absorber to the wheel-hub. [Ours were seized on so tight with dirt and crud that we needed a very long bar over the spanner to get enough leverage.] You will then need a second 17mm wrench to hold the nuts in place while undoing the bolts and it may also be necessary to brace it against a heavy part of the axle setup to get a turn on it.
7. Remove the three 12mm nuts from the studs on the top-mount of the shock completely so that only the tension of the spring is holding the shock-absorber in place.
8. Now that that two large bolts holding the base of the shock have been removed, the brake-assembly should tilt forward a little to allow the shock room to move out. The spring will still be holding the base of the shock against its mount but, as there is no weight on it, it should work back out of the mount and down into the gap behind the axle. The top-mount studs should now clear the suspension turret and the shock and spring assembly can be lifted out of the wheel-arch.
ASSEMBLY:
If you're coilovers are fitted with top-mounts right out of the box then go straight to Refitting. If they require you use the car's standard top-mounts [like ours did] then you'll need to get them off the old shock by slowly removing the 19mm nut at the top of the damper-piston - when the nut comes free the spring won't be under enough tension to pop anything off. The piston will begin to turn with the nut, so grip it in a vice if you have space, though strong grips or better still mole-grips will do fine.
Include the top-mounts in the assembly of your coilovers, but don't tighten the nut at the top of the piston completely [the coilovers will have a notch so the piston won't turn with the nut], so that the triangular top-mount can still be rotated to find the turret.
REFITTING:
1. Reverse the lifting out procedure to get the coilover in place with the three top-mount studs mounted in the turret.
2. The coilover shouldn't be under much tension at all with no weight on it and most [including ours] have helper-springs to ease compressing them slightly, so with a little elbow grease it should move into place to get the two large 17mm bolts through to fix the
base of the damper to the hub. [We placed a thinner metal bar through the top hole to help get the coilover aligned, which made it easier to get the lower bolt in first.] Tighten the nuts using two spanners again until the brackets on the damper are clamped tight to the hub-mount.3. Slide the collar of the brake-hose into the U-shaped bracket on the coilover and insert the flat metal clip beneath it to hold it in place.
4. Replace the three 12mm nuts to the top-mount studs on the suspension-turret below the parcel-shelf.
5. Now the coilover is seated, tighten the large nut on the top of the damper-piston to about 40PSF with a torque-wrench. [We used a lo-tech 'bendy-bar' torque-wrench, but whatever, I'm sure just a good tighten would be fine.]
6. Replace the wheel, parcel-shelf, seat-back and squab.
--------------------------
This was quite an ambitious task to undertake at home - we found ourselves baffled, frustrated and dashing out to buy new tools more than a few times!
Demon Tweeks quoted me £200 to fit all four coilovers and said it would take about 2 hours. With all our figuring-out and store trips we spent a good 10 - 12 hours over two afternoons fitting just the rear pair [although I hope this guide might help one of you to do it quicker than us] - a saving of about £100 - but either way they're on and the suspension is now MOT'able!
Tuesday, 8 June 2010
Steering-Rack Boot Replacement
The O/S steering-rack gaiter, which is a rubber boot that holds grease around the rack, was leaking and this was an MOT failure so before turning to any Subaru garages I shopped around online and got a pair of the boots for £12 from PartsFromJapan.co.uk, who have an amazing selection of the smaller, rarer parts and, with a little help, managed to get the O/S one on in under an hour.


PROCEDURE:
1. Jack the car and get the front wheel off, on the side you're doing the boot on obviously.
2. Take off the front under-tray by removing the two 12mm bolts on the centre cross-member, two 12mm bolts beneath the front lip and the two 10mm screws at the sides.
3. Linked to the hub, just behind the front-edge of the brake-disc is the track-rod end, which runs up into the steering-rack. You can see the rubber-boot over the far end of the track-rod, covering its join to the rack-body. [Mine was split totally in half as you can see below and had seeped grease everywhere.]
4. Using a 17mm open-ended spanner undo the locking-nut holding the track-rod to the hinged mount on the hub. The nut is facing the hub not the rack so if you're facing the brake disc it un-tightens clockwise. The track-rod will likely rotate and move up and down on its bushes so hold further down the rod with strong-grips [or a funny sized spanner if you have one, we got one to fit but its not metric and doesn't have a size printed. I also ended up bracing this against the thick hub-frame to get enough turn on the big spanner to crack the nut.]
Once the locking-nut is turned only slightly, it should allow the track-rod itself to turn freely, anti-clockwise, out of the hub-mount.
5. Open the finger-clip holding the near end of the rubber-boot and slide it off the rod. Undo and dispose of the clip or tie holding the large end of the rubber-boot on to the rack body. Cut open the rubber-boot and slide it down off the track-rod. [Mine had been split, and the rack exposed, for quite some time so I cleaned off all the dirt and grease I could with a rag - thankfully no gravel has got into the steering!]
6. Re-grease the rack and smear a few blobs of grease around the inside of the new rubber-boot. [We used Castrol LM Grease we had lying around. I'm not sure what Subaru suggest, but any thick engine grease will do.]
7. Slide the new boot over the track-rod end, working the narrow part over the locking-nut, and up into position. Replace the clip/tie from the large boot end with a cable-tie, then slide the finger-clip back down the rod and re-fasten it. Screw the track-rod back into its mount and tighten the locking-nut hard anti-clockwise. Replace the wheel and front under-tray.
This is a relatively simple job, done in an hour with just a few spanners and would no doubt cost plenty at a garage, let alone one of the 'Subaru' ones!
Sunday, 6 June 2010
MOT Update - 2 weeks to go!
The test looms near and wow there's a lot going on in Scoob world! - I've spent over £1000!!
Just over a week and I've sorted all but the few mechanical problems.
Heres the checklist so far :
1. N/S Headlamp Aim - The 98 model Scoob features electronic headlamp-leveling [for when you're towing a caravan] so the beam for my O/S headlamp can be raised with the flick of a switch. The N/S one is off a 94 Scoob though, with no fancy leveling and simply had to be raised the old-school way by shining the lights onto our garage door and adjusting the beam up manually with the ratchet behind the light-lens.
2. Number Plate Lights - Luckily the 'broken' one only needed a new bulb, the socket was just hiding away in the bumper so I replaced both bulbs with 'Heavy-Duty' 12v-5w mini-bulbs @ £3.99 from Halfords. The other socket had worked its way free of its mount so I just screwed it back up with a 10mm long self-tapper. Simples.
3. Foglamp Not Working - This got fiddly! We took the bulb out, which looked blackened so we chucked in a replacement to find this wouldn't work either. After much deliberation over whether the switch or wiring may be broken we reached for the Multimeter... I first downloaded some wiring diagrams for the rear lights and as my dad and I got our heads around them we discovered that the two wires that run to the Subaru fog-lamp were not connected to anything on the new twin-clusters. I chopped the wires from the fog-lamp on the new clusters and fed them directly through the connector and into the two terminals that had previously been blank. Hey presto! Instant fog-lamp! Its a great feeling to know I've finally given the car a fog-lamp it never had before, but weird how she sailed through her last 2 MOTs with these lights on - no mention of the friggin non-existent lamp! Dodgy!
4. ABS Warning Light On - I downloaded a "Diagnosis Checklist" for the ABS warning light - a whole 50 pages by itself!! We grabbed the multi-meter and managed to work through the major components [PCM control-module, power circuit, etc.] with no results. I've deduced it is probably one of the tiny ABS-sensors on the wheels, which are nigh-on impossible to replace, so for now I decided to just take the bulb out of the warning-light in the dash. Had to take the whole dash apart to get the gauge-binnacle out, but all in all the job took less than an hour.
5. O/S Steering Rack Boot Split - Found the part on a great site called JapaneseMotorSpares.co.uk, who have a superb stock of all those niggly, hard-to-find import parts. A pair of the boots cost £12 delivered and arrived the next day, absolute bargain, so I will have to get around to fitting the other one seeing as I have a spare. We got the boot on very easily in about 1 hour - I'll cover it in a post soon as.
6. N/S Rear Shock Absorber Leaking - I went a bit mad here. A pair of OEM [Kayaba Racing] rear shocks was the obvious direct replacement and cheap as chips @ £115 - but I didn't buy those. Instead I plumped for an entire adjustable coilover kit from JDM badboys Tein, which was a bit pricey @ £655, but you get what you pay for - these are the real deal!! Me and dad fitted the rear two on Sunday, but its a complete kit so the front ones will have to go on soon. Watch out for the post!
7. Emissions and Noise Excessive - This was the real problem-child. Quik-Fit, National, even large local stores like Chester Exhausts don't exactly shift many of these standard systems, so the cheapest price quote I could get for a full system, fitted while I sip coffee was £819. Ouch. The next option was to buy the OEM system separately and fit it myself. All I could find new was a real budget model 1st and 2nd cat @ £240 together, but still a rear pipe would be extra.
Scoobynet chums suggested I just shell out for a sports-cat for about £250 and have done with it, which will pass the MOT while hardly decreasing the power or noise. This originally seemed expensive to me, but after the OEM shit I guess not only is it the best value-for-money, but actually the cheapest option too lol. I tracked down a nice Prodrive 100cpi sports-cat that should fit straight onto my Peco centre-section... I hope, and its a bit below the average @ £235 delivered, although it is a used item - off a V4 STi Prodrive to be exact :) Hopefully this will get us through the test - I will have to hope it kills the noise a little bit or I'll have to buy a bung...
The deadline is Friday and the Prodrive cat still hasn't arrived so fingers crossed!
Monday, 31 May 2010
Prodrive Seat Emblems!


The emblems cost just £12 from eBay from a guy called Movi-Star - bargain. The grey Prodrive writing is made of a thick, rough suede-like felt and the blue strip is a very nice smooth alcantara type felt so they look and feel like they came on the seats, not like a cheap add-on and from outside the car of course, there's no way of telling them from an embroidered original ;)
The emblems are very easy to iron on, provided you have the right heat setting. They recommend you start on a very low heat and work up so you don't burn the seat, but the transfers won't stick at all unless the iron is pretty darn hot. It took me a good hour of working up the heat for fear of damaging the fabric, but these Subaru seats are tough stuff and in the end I had the iron almost on full heat to finally make the transfers stick, with no burning of the seats at all. Nicely nice!
[To look like the seats in the Prodrive Turbos that is, not the P1 style seats - I saw a pair of those beauties for £300 on eBay, but they're blue and have P1 embroidered, wouldn't suit. Besides, if you wanna talk whole new seats then its got to be Bride 'Holding Monster' all the way (http://www.brideseats.co.uk) - they are the Recaro of the JDM world, shame a pair costs a grand and up!!]
Sunday, 30 May 2010
Engine Cleaning + Dressing - Part I

I've wanted to bling up the engine bay since the day I brought the car home and finally got prompted to this afternoon as I fixed the under-cladding on the bonnet. It was now hanging by a thread and I don't want to chuck it so decided to stick it back up with some aluminum tape. This is great stuff that can be moulded to the underside of the bonnet and its heat-resistant so it won't come loose sat next to the engine.


I started by cleaning the dirt and grease away from a small patch for the tape to stick to, but soon got carried away and ended up polishing the entire underside of the bonnet. I wiped the whole area down with a damp towel, getting rid of the surface dirt but leaving large oily swirls, so I used a mixture of Carb Cleaner and WD40 to cut the grease and get it shiny. Its now a million miles from the tatty mess it was this morning... though it'll shitty up again before you can blink!
The aluminum-tape also served another useful purpose in properly fixing the grille in place - I ran a strip of it along the back of the grille holding it to the slam panel.
The actual reason I chose this rather than screwing through the broken clips is because I've seen a 'Cooling Panel' from GReddy that bridges this same gap behind the grille.
It's made of carbon-fibre and will set you back £145 from Flat4Online.co.uk! [here if you don't believe me] In their words this "increases the amount of air going through the radiator leading to cooler engine temperatures". I'd argue that mine is even better at doing that and cost sweet FA! [tape filched from work of course] The shiny tape also looks cool so while I was at it I smothered the flaking V-belt cover too! [eat your heart out SpecR XD]
Anyway, what good is all this on a grubby engine? I now began the laborious task of cleaning the mechanical stuff [deeper than I have before] and am impressed with the results!
I first removed all the dirt filler-caps and gave them to my dad, who very kindly bathed them in white-spirit and painstakingly brushed the grease from the detailing - they're now reflecting the flash!
I then used more turps to clean the crud off every pipe, hose, wire and lead, as well as the cam-cover, radiator, intercooler, everything... I then rubbed tyre-dressing into all of the black rubber-hoses to get them looking a bit fresher.
As a finishing touch I took the dump-valve off for a polish, but most importantly to turn it round so the Bailey logo is facing out!
Very surprising that the Demon Tweeks mechanic would fit it like that - unprofessional I think, because any person shallow enough to buy a loud, hissing dump-valve would want to see the logo!
Saturday, 29 May 2010
Pre-MOT : The Verdict.
The current MOT runs until the 22nd of June, but after being told by the dudes in National Tyres the other week that my rear-shocks were kaput, I decided to get the car in as soon as possible and find out what the damage really is.

The last MOT was done at Seaview Motors in Liscard, Wirral and as Village Motors in Wallasy [where I stupidly kept taking my BMW] are the most knit-picking test-centre in the world, I thought it couldnt hurt to give Seaview a try if they know the car.
The test cost £45 quid, which is a whole £20 more expensive than Village Motors, but if I'd taken the car there I then it would be for sale right now...
Here's a scan of the test-sheet itself. Im amazed it didn't fail on anything more serious!
What I'm most surprised at is that the brakes came home A-ok - the discs at the back are pretty worn! The bane of my life with the BMW was rubber-bushes all over the place - only pennies to buy, but an absolute bastard to fit. Subaru obviously know this then and fit superb ones to their chariots! [unless I was just right to trust Seaview garage to be lenient... ;)]
Ok so a few things on there, but it's not the end of the world. here are my intentions:
1. Headlamp - It's off a MY94 Scoob so it doesn't fit the grille right and this pushes it down to aim for the floor. I had to cut a slice out of the grille to fit it this far... so more will have to go if need be to tilt it up.
2. Number Plate Lights - Pennies to replace the bulb and a bit of glue to stick it back in place - done.
3. Rear Foglamp - Someone hasn't fitted the twin light clusters at the rear properly, leaving off the wires to the fog and reverse lights. Should be an easy fix when I find the wiring diagrams.
4. ABS Warning Light - This is a tricky one. There are 65 pages in my workshop-manual devoted to diagnosing problems with the ABS light. I'll be checking all the basic components with a circuit-tester and the mechs at work can run a diagnostic machine on her, but the tiny brake-sensors are very hard to replace, so if thats the case I might just cut the wire to the warning light.
5. Steering-Rack Gaiter - A rubber sleeve that holds grease round the steering-rack has split. £10-20 for a new one and its a doddle to fit, provided nothing has seized.
6. N/S Rear Shock - Was well chuffed when only one of the shocks failed after the National guys said both were wrecked - best to replace both though anyway! A replacement OEM pair [Kayaba Racing] is a snip @ £115 for the pair from camskill.co.uk. What I really want though is a full set of coil-overs for the car - and it has to be Japanese. I fancy a set of the TEIN Super Sport kits, usually costing a grand, which are going for £650 on eBay - I could just afford to take this giant leap so fingers crossed.
* 7. Emissions and Noise - The exhaust is the only bit that baffles me [no pun intended!]. I can fit a bung to make it quiet, but emissions is a different story. I'd suspected the CAT had been removed and wasn't surprised to hear it would need to be put back on for the MOT. I can slap on a brand new budget unit [down-pipe, CAT, front-pipe] for £120 from a great site called Cats-Direct so no worries there, but now the problems begin. Will the OEM front-pipe fit onto the 3" custom centre-section? It can be adapted to fit as long as its the right length to meet the join but, even with the CAT on, the custom straight-thru centre-pipe and back-box might still fail the emissions test.
So will I have to splash out on a full standard exhaust-system? Guaranteed pass and my fuel economy will certainly improve no end! The car would also be peppier at low revs and the engine idle more nicely and generally be more sedate. Lets not forget that I'll be dropping about 20bhp though! And what can I do with my beautiful 3" s/s turbo-back system? Bin it?
Decisions, decisions... I've been preparing to spend some money for the MOT for a while now so lets wait and see.
Monday, 24 May 2010
Re-Inventing the Wheel.... Arch - Part I
Time to get to grips with the daddy dent - the o/s rear wheel-arch. Seems like someone really scraped the gatepost...


This is the most ambitious part of the bodywork I have attempted so far, but the process was just an advance on the bonnet-lip fix.
PROCESS:
I first removed the rubber beading from arch, which peels off pretty easy, and sanded round the entire damaged area, down to the bare metal in most places, particularly on the small rust patches. The rust was only very slight to be fair, but still took some sanding off to get to clean metal, which is essential to stop the rust from coming back underneath the paint. The arch was pushed in more than it seemed and the corner where it meets the bumper had kicked out slightly so we lightly pulled the arch-lip out by hand, then fine shaped it and knoc
ked the bump in with a ball-hammer.
I then covered the whole area in a nice thick layer of P38 filler [which was drying in the sun so fast it took about 10 mixes] and began to smooth the area down, trying to blend the filled dents into the line of the wing. Filling in the dents was easy enough, but as I sanded down each layer in contour with the body the filled patch got smaller and out of shape with the rim of the wheel-arch, so it took a few mixes to build the area out to match the arch line and flow into the body.
I held a straight-edge across the arch to check I'd filled out to match the other side of the car and when I was satisfied I sprayed the area with a quick coat of primer to get a better idea of the shape. The lip of the arch was wide enough, but the primer revealed it would need building out a bit more to be able to recreate the flat side of the arch lip. I repeated the process and built the lip of arch out a bit more in order to sand it flat for about 1cm before it curves off into the body.
Got the flat section looking pretty good, but still needs a little filling out before I get round to painting it. That may be some time as its back to work I go!
Sunday, 23 May 2010
Painting the Bonnet-Lip
Had a few days off this week and got serious with the bodywork, starting by painting up those primed bits on the bonnet. Thought I should buy everything I'd need to do a professional(ish) job, so I grabbed a can of Clear Lacquer and some Rubbing Compound from Halfords [each £5.99], bringing the total cost of the bodywork to £36, but worthwhile for the quality of the finish!

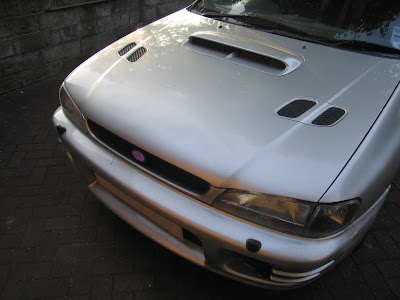


Not a bad job!
PROCESS: I marked out an area on the bonnet-lip around most of the stone chips and sanded the paint completely down to the grey Subaru primer. I then began to spray on lots of very light coats of paint to avoid drips and run-marks - each coat dries in 5 mins. if it's a reasonably warm day. The contours of the sanded areas start to show up though after a few coats and I think the paint bunches up around the edges so I gave it a light rub down with very wet 600/1500 grit Wet/Dry paper every few coats to stop the paint ridging. After a lot of rubbing down and spraying [well, it is my first try], I got the lip covered and more-or-less blended with the rest of the bonnet.
I left the paint to dry overnight and then began rubbing it down with the super-fine 1500 grit Wet/Dry paper, soaked in plenty of water. As well as to clean the paint surface, rubbing it like this is required to create a smooth matt-finish for the lacquer to coat it properly. [which I would never have guessed as the paint match looks so good anyway.] I then started to spray the lacquer on, coat after coat, until I'd used about half the can!
To finish I'll need to use the Rubbing Compound [a bit like T-Cut] to smooth the lacquer down to match the rest of the bonnet and give the seamless finish I'm after, but it'll have to wait - the lacquer-can recommends waiting 2 weeks first!
Either way it's given the bonnet the much needed facelift! [along with properly fastening the grill, which I'll cover later in a bit about engine-dressing] The peppered lip and those 3 giant nostrils are history!
Saturday, 22 May 2010
Custom Boost-Gauge Proposal
I always knew I'd want a boost-gauge when I got a turbo car, so I've priced up some nice JDM ones on eBay - I've always been fond of the APEXi EL range (blue-glow) dials, costing over £120 new and going for about £50 used online. The OEM gauge, fitted to STi/Type-R Scoobs, is actually a GReddy piece and is styled to match my white Subaru dials and labels. Hard to find new, but there is a nice used one on eBay at the moment, complete with the vacuum-tube, T-piece and bracket to fit my car @ £60 - ultra tempting!
I just can't see anywhere to mount it though so I've had to consider my options...
Bracket: I can mount the gauge anywhere in front of me, but the vacuum-tube and backlight wires would be exposed and drop through holes drilled into the dash, which would be messy and the lone dial sticking up would look out of place anyway.
A-Pillar Pod: This makes the gauge install far too substantial and I can't see myself putting in any more expensive gauges so no point. Besides, these are so unbelievably cliched in car-world, [I've seen someone with pods on both A-pillars of a standard car and not a single gauge between them] that I couldn't stoop so low!
Centre-Panel Cluster: The full rally effort, but this means doing away with the cubby-hole lid and losing the storage space and, again, I won't be buying another two gauges to fill the pod.
I guess the bracket is my only option unless I get serious and do a custom install into the dash. I've seen this done on plenty of early 93-96 Imprezas, [in the ash-tray spot and on the top of the centre-panel] but my 98 dashboard is just too cluttered with extras and compact for storage. People have suggested losing one of the middle heater-vents and making a flat panel - easy, but with British winters I don't think so...
This is the solution I've come up with, although it's a bit on the ambitious side... Sink the gauge into one side of the cubby-hole on top of the dash so the tube and wires are hidden away and cut a recess into the lid of the cubby-hole to show the dial-face through. The dial would have to sit proud of the lid to be seen, but it's only a 60mm gauge so not by a great deal and, most importantly the lid can still open to use the cubby-hole, and inspect the gauge if I need to. To be extra tidy I could build a cowl over the gauge and smooth it into the lid with body-filler. This would look absolutely siiick and cost pennies to do, but I can't match the textured-surface of the lid so maybe cover the whole the whole lid in a sheet of real carbon-fibre @ about £25... :)
I've made some rather crude virtual images of how it might look soon, perhaps:


I just can't see anywhere to mount it though so I've had to consider my options...
Bracket: I can mount the gauge anywhere in front of me, but the vacuum-tube and backlight wires would be exposed and drop through holes drilled into the dash, which would be messy and the lone dial sticking up would look out of place anyway.
A-Pillar Pod: This makes the gauge install far too substantial and I can't see myself putting in any more expensive gauges so no point. Besides, these are so unbelievably cliched in car-world, [I've seen someone with pods on both A-pillars of a standard car and not a single gauge between them] that I couldn't stoop so low!
Centre-Panel Cluster: The full rally effort, but this means doing away with the cubby-hole lid and losing the storage space and, again, I won't be buying another two gauges to fill the pod.
I guess the bracket is my only option unless I get serious and do a custom install into the dash. I've seen this done on plenty of early 93-96 Imprezas, [in the ash-tray spot and on the top of the centre-panel] but my 98 dashboard is just too cluttered with extras and compact for storage. People have suggested losing one of the middle heater-vents and making a flat panel - easy, but with British winters I don't think so...
This is the solution I've come up with, although it's a bit on the ambitious side... Sink the gauge into one side of the cubby-hole on top of the dash so the tube and wires are hidden away and cut a recess into the lid of the cubby-hole to show the dial-face through. The dial would have to sit proud of the lid to be seen, but it's only a 60mm gauge so not by a great deal and, most importantly the lid can still open to use the cubby-hole, and inspect the gauge if I need to. To be extra tidy I could build a cowl over the gauge and smooth it into the lid with body-filler. This would look absolutely siiick and cost pennies to do, but I can't match the textured-surface of the lid so maybe cover the whole the whole lid in a sheet of real carbon-fibre @ about £25... :)
I've made some rather crude virtual images of how it might look soon, perhaps:
Tuesday, 18 May 2010
Cleaning up the Roof-Scoop mess!
Whoever glued the aftermarket roof-scoop on used not epoxy resin, but silicone bathroom-sealant so, unsurprisingly, Trevor who I bought the car from said it flew off on the motorway during his reign.
This left a horrible horseshoe of dirty silicone where the scoop had been bonded and I thought it was high time to get rid of it.


I used tar-remover to soften the sealant [just xylene paint-thinner basically] and gently shaved it away with a square-cut razor blade. [not a Stanley-knife blade!] I then used a kitchen-scourer and more tar-remover to get the fine bits off. This left patches of light scratches and discoloured paint so I finished by rubbing in a load of T-Cut, which has made the horseshoe shaped patch barely visible close up and restored the silver.

At first I thought the paint would crack off before the sealant did so I was surprised when I got it sorted so quick. Still needs a bit more T-Cut and elbow grease, but either way what an improvement!
Friday, 14 May 2010
Carpeting the Boot Install
Got round to carpeting the plywood install in the boot at last with some nice grey acoustic cloth, filched from the skip at work.

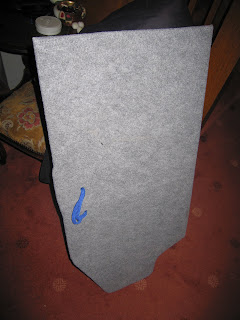

I just placed each plywood section onto a piece of the cloth, folded about 3 inches round the back and tacked it down every 4 or so inches along. For the curves and fiddly bits I cut the fabric edge into strips at the corner apexes and at points along the curves, which may not be the professional way, but certainly recreates the shape of the wood well and looks great!
I would recommend sticking the carpet down with spray-glue before tacking the backside, but I didn't bother. As the plywood is so thin, nails and carpet-tacks we're no good, so I used drawing pins, which are the perfect length. This also keeps things cheap and incurs the first cost of the entire install @ £1 for 3 boxes :) - quite amateur looking though, at least they're hidden away.
This has really made the boot look complete and useable! Just a few more finishing touches - a storage area on the right hand side and neatening up the jack compartment on the left side - and it's done.
NB: I have now weighed each part of the install, including the amp and sub-box, and the total comes to 32kg - about 5 stone! - in other words the weight of a small passenger...
Subscribe to:
Posts (Atom)


