<-CLICK HERE FOR SCOOBY TECH. POSTS ONLY! CLICK HERE FOR GRAN TURISMO POSTS ONLY!->
1998 Impreza Turbo Project Car + Expanding WRX Knowledge Base!

Sunday, 12 September 2010

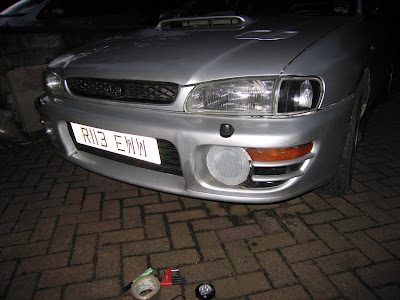
Fake Spotlight.. er... Conversion!

People at work have begun to tell me that I have a hole that needs filling... I need to buy a new spotlight for the front bumper! Funds are still a bit tight after summer hols and I'm busy saving for some fancy new brakes so form has follow function in the money department I'm afraid and I can't justify spending up to £80 to sort the light out yet.

I have looked on eBay for some cheap 2nd hand replacements, but it's not just the lamp itself I need, its also the mounting brackets, the bolts etc. One of the bolts has also snapped and is stuck in the hole so that will need drilling out and re-threading too. Long!

But to try and appease the car's fans at work I have instead decided to knock up a fake spotlamp to fill the gap temporarily using, you guessed it, bits and bobs exclusively from the skip at work!

PROCESS:

I started by cutting a spotlamp sized disc out of a piece of clear-plastic insulation-board. This turned out to be the key element to the design as I noticed that the lines down the board mimic the diffuser-lines in the actual light lens. I then cut 1 inch off the end of a wide plastic drainpipe and glued it to the centre of the board to keep the fake light-lens proud of the backplate to match the depth of the real one. To hold the fake lamp onto the backplate I was going to need a fake bracket, so I cut a rough shape out of ABS-plastic [from the mould I used for my carbon wind-diffuser] that was wide enough at the bottom to meet the two screwholes and fixed the fake lamp to it with ally-tape.


Finally I fixed the fake lamp into place, using the original screw holes, with two allen-head alloy bolts and a bit of ally-tape at the top to stop it wobbling.

Saturday, 14 August 2010

Custom Alloy Footwell Plates!

I got hold of a nice big sheet of checker-plate aluminium so I'm fabbing up a few nice little touches for the car. I've already made a few under-bonnet styling pieces, but with the lions share of the plate I've started making some rally-style alloy footplates for the driver and passenger.

Its a great racing-car look [no chrome-plastic imitations here] and really suits the Impreza interior. Its a lot harder wearing and easier to clean than the mats, but the downside is its a bit slippy when its wet, as I've discovered with the recent bout of gloomy weather. Checker-plate is pretty cheap to buy, but these footrests aren't cheap items - eBay has some budget pieces starting from about £20 per side, but if you want a brand, Demon Tweeks have a Sparco set @ £91 for the passenger footrest and £34 for the tiny driver's clutch-rest!

Making them was a doddle. The whole driver's side footwell had to be covered, but I didn't have enough plate for both so I decided to give the passenger a large footrest and just cover the bottom wall of the well. I took a few measurements of the footwells, cut the plate to fit and rounded the edges off with a file for a neat finish. For the driver's side I bent the thin end of the plate up about 45 to match the floorpan and cut a gap out to fit round the plastic-stopper under the go-pedal in case I stifle the throttle. [restrictor-plate? :)] Well my measurements we're a bit off, but without scrutinising the fit doesn't look too bad at all. A boss bit of rally-bling for the cockpit - not bad for a free off cut of alluminium!

Tuesday, 10 August 2010

Custom Cold-Air Duct + Some Engine Dressing

I've never felt that the standard cold-air feed has been good enough to feed the induction-kit. The OEM duct consists of 4" wide plastic pipe that feeds the airbox, which has two inlets that join in the O/S front-wing - one comes up from a vent somewhere in the front-bumper and another that just catches ambient air at the side of the grille.

The car isn't exactly gasping for air, but with the straight-through exhaust and induction I think its time to rethink the bumper inlet and fit a bigger, more direct duct. For the meantime, I've thrown in an extra temporary duct-hose to aid the air flow a little. I found a nice length of flexi-hose that fits nicely between the cone and a gap in the grille, but its not much more than 1" in diameter so I'm not expecting a great improvement in performance. It's some more air flow none the less.

*EDIT: Just found out that the flexi-pipe is the heater-duct from an LDV Maxus van so we're now rocking British Leyland parts on the Hamamatsu bad boy - how quaint!*

In an attempt to catch more air for the rear of the filter I have started to develop a custom cold-air box around the cone. The exposed filter also has the downside of sucking in hot air from the engine while the car is standing still and the box will also hopefully help to prevent this somewhat - only time will tell.


So far I've installed a back for the box made of plate-aluminium. I got hold of a nice big sheet of the checker-plate and I'm making a few nice bits with it for the front foot-wells and made the piece for the airbox from an off cut. It does look pretty sweet and I've seen alloy used for these before, but ultimately carbon-fibre insulates heat much better so I'll be moving to it, or kevlar, if the design works.

I just cut the plate about 18"x 8" and bent it at a 45° angle halfway down so it curves underneath the cone. I then cut a small metal 90° bracket down to fit and fixed it to the inner-wing using one of the existing wing bolts. I drilled a hole in the top left corner of the plate and attached it to the bracket with a nice yellow allen-head bolt.


Great looks and a nice bit of engine dressing at zero cost! Great, but whether it is functional is yet to be seen. To complete the job I'll add a angled side piece to the right of the plate and some rubber strips to the underside of the bonnet to create a complete air-box.

I've also plenty of checker-plate left over so look out for a host of nice little alloy touches for the interior!

Sunday, 1 August 2010

STi Carbon/Titanium Strut Brace!!

Anyone who's into modding cars knows about strut braces... It's basically a stiff bar that bolts across your suspension-turrets to brace them against each other and stiffen the suspension up. I've always liked the idea of buying one, but it's never been high on my priority list. This all changed when I saw the STi one [in the photo] and I figured that seeing as we've gone to all the trouble of TEIN coilovers, I may as well go the whole hog and finish beefing up the chassis in style.

They haven't made any of the STi ones for a long time so it's hit and miss finding one. Demon Tweeks' cheapest alternative is £100, but it's a heavy steel number from Sparco. eBay has some cheap, but great looking ones from about £50, which are made of much lighter aluminium, but they're unbranded and untested. Subaru really had it licked though with their STi one, fitted to V4's onwards - it's made of carbon-fibre rods with titanium-billet joints and is way lighter than the others, as well as looking achingly good. These usually sell for a ton or more and are quite sought after, but a few are cropping up right now on eBay and there are bargains to be had. I spotted a cheap one and put in a hugely optimistic max bid of £60. My chances were low, but the rival bidders must have been napping because I got it for £55, despite another selling an hour later for £81. The seller went above and beyond as well, only charging me £4.50 for standard-parcel even though it arrived within 2 days! :)

I am very surprised at how much difference this brace makes. I've still only got the standard front shocks on, but the whole front-end of the car is stiffer, feeling much flatter, especially round hard bends, but also noticeably firmer over bumps too! Absolutely brilliant for only £60 - I can't wait to get the remaining TEIN coils fitted to the front, it'll be one seriously stiff chassis! The strut-brace really is light too, I would say it only weighs a few ounces, yet it evidently takes some force. It's clearly built to take it too - it has 'Aerospace Division' emblazoned next to the STi logo, which is awesome. It's eye-opening to see how much the body and suspension flexes - I'd recommend fitting a strut-brace to any car!

FITTING :

This couldn't be any easier - all you need is a 10mm wrench. This is for the STi Classic carbon strut-brace, but the fitting is identical for all other types, though the nuts may be different sizes.

1. Pop the bonnet and remove the 3x 10mm top-mount nuts from each of the suspension-turrets. The weight of the body is resting on the top-mounts so they won't move at all.

2. Loosen the 10mm bolts on either shoulder of the strut-brace so the end-rings can be adjusted easily.


3. Lower the strut-brace under the rear bulkhead and the end-ring holes over the top-mount studs so that there is a straight, snug fit and the end-rings can be pushed flat to the suspension-turret.

4. Replace the 3 nuts to each top-mount with a 10mm wrench and give it a good tighten, making sure the raised mounting-points are all flush against the suspension-turret.

5. Tighten the 10mm bolts on either side of the strut-brace so the entire unit is solid across the turrets.

There you go - fitted in 10 minutes and the difference it makes is astonishing!!

Saturday, 31 July 2010

Braided Hose - Engine Dressing

I noticed a metal cooling-pipe at the bottom of the radiator was corroded quite badly and although it is still working fine and will last a while, the whole outside and both collars are well rusted and it looks near impossible to replace, so I thought it might as well be better protected from all the grit, salt and crap coming up through the bumper-grille.

I figured that rather than just painting it, I may as well do a bit of engine dressing while I'm at it so I cut out a piece of stainless-steel braided hose-covering to give the engine a bit more shine and made two collars to fix it to the pipe with ally-tape.

First, I pushed away the flaking surface metal and gave the pipe a rub down with emery cloth, not to the bare metal, but enough to remove most of the surface rust. I then wiped it with a damp cloth and gave the pipe a good, thick coat of Finnigan's No.1 Rust Beater. I wrapped the braided hose-cover around the pipe and looped some aluminium-tape round each end to hold it in place. The stainless-steel cover fits like a glove and should repel most of the grime, hopefully giving the pipe a much longer lifetime.

Saturday, 17 July 2010

Quickshift Install

I've fancied a quickshifter, which reduces the throw-distance of the gearstick when changing, for a while now and the stock shifter and ball are quite worn and a bit sloppy anyway so the car benefits all round.

I really wanted a Kartboy shifter [www.kartboy.com], from a tiny little american company specialising in go-karts and now making parts for Subarus. Their shifter for classic Imprezas is now discontinued :( and finding one is nigh on impossible, even on import. The next one that caught my eye is GoFastBits one [gofastbits.co.uk/WRX5spdShifter], which features adjustable brackets so the throw-distance can be set to preference. I can't find this on eBay though and it's a bit steep @ £138+VAT from good old Demon Tweeks, but the real turn-off is when I Google this part I find people talking about them being prone to snapping...

eBay was awash with cheaper [and cheaper looking] alternatives though and in the end I decided on one in the lower end of the price spectrum from a small firm called 800bhp Tuning for a piffling £23.50 delivered, which doesn't look great and isn't that nicely made, but is a sturdier looking design like the Kartboy and, for that price, not so much of a worry if it snaps, although its a 10mm thick steel bar so I doubt it'll snap too easy anyway. The pic shows the stock-shifter on the left next to the more compact and shinier short-shift.

The fitting process was actually very quick and easy, even though the instructions provided we're pretty vague and the photos weren't of an Impreza dash, but we did have one nasty little snag that caused a lot of frustration, so if you don't the same fuss make sure you have a set of O-ring pliers handy...

PROCESS:

1. Screw off the gearknob. Gently prize up the edges of the centre-panel around the gearstick until it comes out along with the rubber gear-gaiter. It can be easily forced clear of the dash centre-console and handbrake panels without having to remove them.

2. Remove the 6 crosshead screws that secure the metal baseplate down and lift the plate clear. [The shortshift instructions said to remove four 10mm bolts from the baseplate at this point. I am not sure what model Subaru this refers to that the kit fits, but this shifter only covers Impreza models 97-00 and these will have 6 screws, not bolts.]

3. Remove the long nut and bolt from the shift-rod that holds it to the shift-arm bracket using a 12mm wrench. The shift-arm is able to move around quite a bit when it is free from the rod.

4. This is where things get a bit tricky. You'll need to get right under the car so lift the front and make sure its secure. [Use ramps if you have them. We still don't so we used those large concrete blocks again. I'd hate to get that far under with just axle-stands.] Locate the base of the shoft-rod under the car, behind the prop-shaft. There is a metal O-ring that holds the plastic base of the rod down and this is where we had all the trouble. This will probably be a lot easier with a pair of O-ring pliers, but we spent ages filing down a pair of needle-nose pliers to do the same job. Once the O-ring [second photo] is off, the plastic base should pop out with the shift-rod.


5. Remove the upper O-ring from the plastic base [much easier off the car] and pull the shift-rod ball out of the base.

6. Grease the ball of the new shortshifter [we used the Castrol LM grease again], put a little more into the plastic base and snap the shortshifter into the base. Replace the upper O-ring.

7. Push the plastic-base back down into its mount and replace the lower O-ring. This was a nightmare for us again. You'll need a second person here to hold the plastic-base down so it doesn't push out again every time you try to put the O-ring on. [Getting the O-ring back into place was impossible with my makeshift pliers - it just wouldn't hold the ring at the rightangle. In the end we removed the rubber-boot entirely and dad had to push his fingers through the gap from inside the car to guide the O-ring onto its seat successfully, a brilliant solution albeit long come to.]


8. Raise the shift-arm to meet the shortshifter bearing and replace the 12mm nut and bolt to the bracket, tightening it to a snug fit, but allowing the shift-rod to move through the gears easily.

9. Replace the metal base plate and the 6 screws. We had trouble here too, which wasn't mentioned at all in the instructions. The gap in the metal-plate comes down diagonally at the top left and most shortshifters work by lifting the shift-arm up a bit. The higher angle makes the arm come into contact with the diagonal edge of the plate, so we had to cut that away to give the arm space to move freely [in the right photo above].

10. Replace the plastic centre-panel and the gearknob.

I'm leaving my centre-panel and gaiter off for now until I've re-designed it a bit to better display the shifter, involving a bit more of my carbon-fibre. [My carbon wind-diffuser and other bits are coming along well too, all will be revealed soon!] The shortshift has definitely reduced the throw by about half and the car is singing through gears, not bad at all for the money. The gearknob itself has been raised nearly an inch too, which is weird at first, but with that thinner stick it gives a real race-car feel to changing gear!

Saturday, 10 July 2010

Snapped My Only Key!

I bent the key a bit too hard while pulling it out of the ignition and snapped the tip off it. It was bent already and waiting for an opportunity to go and my heart sank as the tip snapped off inside the ignition, the worst possible place. The gods must have been listening to me right then though, because the metal dust-flap clicked shut a moment later and ejected the key-tip like a CD - fucking lucky!!

It turns out the keys are coded [with a little chip inside the plastic that sends a signal to the immobilizer] so I couldn't just have a blank one made up that Saturday afternoon. Instead I had to leave the car stationary and unlocked until Monday when SafeSmart in Birkenhead opened again.

It cost £30 to have the key made up, but if I had a spare in the first place I wouldn't have had any trouble so I decided to future-proof myself by having a second one done to boot. Still not bad @ £60 [i'd have paid double that to get up and running again] and I have a spare - great, as I ran my BMW for 3 years with only one key and worried my arse off.

Thursday, 8 July 2010

Bumper Touch Up

Not a lot going on in Scoob world of late as I'm still reeling from the month of MOT, but I've managed get a little done on the bodywork. [I've also got some interesting work in progress involving a lot of carbon-fibre :) coming up.]

The car had obviously been backed into a post of some kind, leaving two lines on the bumper and a lot of the paint has been helped off by the sticker I had on so I thought it was high time to paint it.

I didn't think the lines would need filling, but it turned out they were pushed that little bit into the bumper. I then just rubbed down, primed and painted the corner. A detailed description of this process can be found in my previous posts Painting the Bonnet Lip and Re-Inventing the Wheelarch Pt. I.


Massive improvement, I will have to get around to lacquering it soon. Back of the car looking pretty complete now, although I have a nice carbon wind-diffuser on the way as a finishing touch!

Saturday, 26 June 2010

Cost Analysis: What's the damage so far?!

OK, so you're probably thinking I've spent quite a lot on this chariot in 4 short months... so heres a cost breakdown of every little thing I've bought so far, in a delightful table format.

Monday, 21 June 2010

Sparco Carbon-Fibre Pedals!

With the serious MOT work out of the way it's time to throw on some more tacky parts, starting with these ultra-light, 100% carbon-fibre racing pedals from Sparco. I've always wanted a set of these range-topping pedals, but figured £55 was a bit much. Luckily I tracked down an unused set on eBay for just £24 delivered - win.

There's one small catch though, the set only comes with 8 of the 12 nuts+bolts and one of the stick-on grips is missing. Oh well, I doubt I'l be using the grip tape anyway [it'd ruin the look!] and I got away with just using 2 bolts for each pedal [for maximum weight-reduction, obviously] so I've 2 spare anyway.

Its clear to see why these are for motorsport use only - form definitely follows function here. I've always thought the teutonic carbon look is fantastic, but the finish of the lettering, screw-holes and the entire back surface is pretty poor. I guess these aren't a styling piece then, but the real beauty of the carbon is that they're ultra light, weighing less even than the rubber OEM pedal covers and are a fraction of the weight of Sparco's alloy-pedals [like on my BMW], which cost half as much. That's the difference and damn it feels good to be elitist!

As with all bolt-on pedal sets, these were a doddle to fit. My rubber-pads had already completely worn away so it wasn't hard to find somewhere for the 2 drill-holes on the steel pedal in the space either side of the lever itself. I'd planned to cut the long plastic accelerator pedal down a bit for the carbon pad, but its a tilting one, so I just managed to cover the whole thing with the Sparco and didn't bother - it interferes with the brake pedal though unfortunately. I thought I had the clutch pedal bang on too, but its a bit close to the footrest on the left so I can't quite squeeze my foot down to it - this might be in need of a quick move to the right.

Sunday, 20 June 2010

MOT Pass!!

By the time I got back to Seaview motors it was a couple of days too late to get the re-test for free, so I had to fork out another £40 quid, but he very kindly agreed to only do the partial test and check only what the car had failed on anyway. The current MOT still didn't expire for another 6 days, but it turns out I don't lose any of it as this latest certificate is valid from the day of the test, but runs until a year from the current end date [16th June 10 - 22nd June 11] - very nice.

First up was the emissions, with the car recording less than half the original CO2 figures just from the addition of a sports-cat, [although I'm sure the oil/filter change played it's part too]. The guy also reckoned the exhaust had dropped in volume sufficiently, so that was £235 well spent and this cat doesn't kill power so it can stay on.

We got the Scoob up on the ramps and I talked him through the mechanical work, then I jumped in and we did a quick check off all the lights, all things A ok. He did mention that the headlight beam had been lifted just enough, although both were still out of line and should be checked in future, but he didn't even prescribe any advisory notices, so excellent.

If I'd bought the standard shocks instead of the TEIN coilover setup then I would have got the car through for about £400 [or even <£300 if I found a used OEM exhaust]. As it stands I've spent about £900, but hey ho, progress is progress! The standard £115 shocks would have got me through the test, but compressing the old springs back on would have been more involved and the front shocks might need doing soon anyway. I also planned to lower the car at a later date, so thats out of the way too. Besides, doing all the work myself has saved me one hell of a packet and I have the great feeling that no ruthless mechanic has rattled the parts on :)

The true positive outcome of this MOT is that the car is rid of those dodgy discrepancies. It's obviously been pushed through some bent MOTs in the past, with no fog-lights or catalytic-converter, so it's good to know I've brought the car back into check for next year, or the next owner. Time to get back to the bodywork and buy a new front spotlight!


Wednesday, 16 June 2010

Prodrive [TSL] Sports-Cat - Emissions Sorted!

The last thing on my MOT list was the exhaust emissions, my total de-cat pipe was desperately in need of a catalytic-converter. A standard one would be £140 new and the right length to meet the joint on my Peco, but joining a pipe of less than 2 inches to a 2.5 inch big-bore would be an interesting challenge. I then found out the OEM system relies on 2 cats, doubling the price and forcing me to buy a whole new back section as the 2-piece Peco would have to be fully removed.

If I was going standard then I'd need a full system. The simplified design of the straight-through Peco replaces 4 OEM parts on my 98 model and tracking one down that looked as if it would fit was a pain. Although I could find used 'full systems'
on eBay for as little as £80, they just didn't seem to be everything I needed [from the back of the turbo, right to the tailpipe]. I'm not sure if the exhaust differs much from year to year on the WRX as most upgrade parts fit all classics, but some sets had both cats under the car, some had one cat on the downpipe and some had no downpipe at all. To guarantee the right fitment I turned to new exhaust suppliers, the cheapest quote being from Kwik-Fit @ £850!, so that was right out.

I'd heard about sports-cats, which fit onto a big-bore system and replace both cats with a single concentrated one, but at around £250-300 they seemed too dear. With the price of an OEM system sky-rocketing though it now seemed like a good idea. The ones in my price range looked pretty naff though to be honest, but I stumbled on a second hand TSL one, highly recommended and used by Prodrive, which was a snip @ £235. Of course there's always the worry that a used cat off eBay might be wrecked, but the guy selling it was none other than scooby-leicester who supplied me with the fuel-filler pipe in April, so I figured it was worth the chance just to keep everything on the car top-notch.

The sports-cat is excellent. Not only did it more than half the emissions figures and pass the MOT, but it's reduced the noise a bit too and got rid of the racing-car crackle and the pops when letting off the gas, which is great news for my neighbors and passengers, even if the car has lost a wee bit of character. The engine seems to be ticking over much more smoothly and evenly too, there's less vibration in the cabin and there even seems to be a little increase in power at low-revs - the car seems peppier anyway and I'm finding myself pulling away in 2nd now at times when I would have reached for first. The only downside to the sports-cat seems to be a loss of power at high-revs. Where the car would scream the entire way up the rev band before, there's a feeling now like something is tugging on the power when you get right to the top. It's not a great loss, the car feels just as quick where it counts and it's a bit more useable day to day now and at least I still have the de-cat front pipe there, ready for trackdays...

FITTING: [This covers replacing the front-pipe of a big-bore system (de-cat to sports-cat or vice versa), although the standard front-pipe (1st cat) is very similar to fit.]

It wasn't a lot of work to fit the sports-cat, just undoing a handful of bolts and the pipe is a doddle to replace, provided you can safely get right underneath the car, as a few of the bolts are too hard to reach otherwise. The exhaust bolts are constantly heating and cooling and they shouldn't have seized on too tight, so the job should be over in 2 hours.

1. Lift the entire front of the car, but don't use axle-stands - you'll need to do some heavy bolt twisting right underneath the car and axle-stands just aren't sturdy enough with both front wheels off the ground. The wheels don't need to come off so use ramps if you have them. Be sure to get the handbrake well on and chock the rear-wheels front and back. [We have no ramps and drove the car onto a couple of large concrete-blocks, which worked really well and large wooden blocks would be just as good, but I wouldn't advise using house-bricks or breeze-blocks.]

2. Get the front under-tray off by removing the two 12mm bolts on the cross-member and front-lip, then the two 10mm bolts on either side.

On my 97/98 model, among others, the Lambda oxygen-sensor is located on the right side of the down-pipe collar, just behind the turbo.

3. Unplug the Lambda sensor from its wiring-connector, by inserting a slim flat-head screwdriver into the sleeve that runs along the bottom of the plastic-clip. Slide the screwdriver down the length of the sleeve until the connector-plug can be slid from the socket.

4. Unscrew the Lambda sensor from the front-pipe collar using a mm open-ended wrench.


5. Remove the 2 large bolts and the 3 guiding-stud nuts that run around the collar and fix the front-pipe to the back of the turbo, using a 14mm wrench [although one of our stud-nuts underneath was a 13mm fit, but I don't think this is standard]. The upper ones are easy enough to get to, though all but the bottom right one can still be accessed, just, from under the bonnet. That last nut can only be reached by lying flat under the car and reaching up into the engine, [quite scary if the nut is hard to budge at first]. The guiding-studs will hold the pipe up when you unfasten it from the centre-pipe so there's no need to leave any of the collar-bolts on to hold it.

6. Remove the 2 long bolts from the bracket that joins the front-pipe to the centre-pipe, halfway down the underside, using a 13mm wrench.

7. Remove the 13mm bolt from the pipe-bracket, just behind the front wheels. The front-pipe should now be free to lift off the studs on the turbo and out under the car.


8. Wipe off around the back of the turbo and the centre-pipe inlet, as well as each end of the new pipe. Give the metal gasket from the back of the turbo a good wipe, apply a little exhaust-sealant paste [we did, but not essential if your gasket is in good nick] and replace it.

9. Lift the new front-pipe up from underneath and replace it over the studs on the turbo. Re-insert the 2 top collar-bolts and tighten them enough so that the pipe moves up to align with the centre-pipe. The gap in the rigid cross-member is a tight fit, so the pipe is confusing to align without guiding it with the collar-bolts.

10. Seat the front-pipe into the centre-pipe and replace the two 13mm bolts onto the bracket. The big-bore system has a resin gasket so no need for sealant, but make sure the bolts are wound tight. Then replace the 13mm bolt to the hanging-bracket behind the front wheels.

11. Replace the 3 nuts onto the collar-studs on the turbo using a 14mm wrench and fully tighten them along with the 2 bolts at the top.

12. Give the Lambda-sensor a quick wipe and screw it back into it's hole on the collar of the new front-pipe using a mm wrench. Plug the sensor wiring-connector back into it's socket and you're done.

Saturday, 12 June 2010

TEIN Adjustable Coilover Suspension - Part I - Rear

Only one rear shock-absorber failed the MOT in the end, even though the guys at National said both were shot. I took their advice anyway and decided to replace the two. A pair of the OEM (Kayaba Racing) shocks was £115 from Camskill.co.uk, but before I could buy them a mate at work offered me a complete set of GMax racing coilovers his friend was selling for £200. A set of these would set me back £700 odd quid new, so I instantly accepted. The next day he informed his mate had already moved them on - that or he'd figured out how much they were really worth.

I turned back to the OEM shocks, but my heart had been set on the coilovers and over the next week I slowly came to the conclusion I should treat
myself to a setup - I've been dying to spend some money on the car after all... I didn't fancy the cheap-looking GMax though and I have said all along that I want to keep it as JDM as possible, so I did a bit of research and decided on an entry-level kit from Japan bad boys TEIN [http://www.tein.co.uk], who I've heard and read a lot of good things about - they are also very nicely made and look fantastic! Theyr'e pricey @ £650 [cheapest I could find off a guy called mjd128 on eBay], but you get what you pay for...

Coilovers are a serious suspension upgrade, replacing the entire spring/shock assembly with a much stiffer, sturdier damper unit, which is also lighter and more compact as well as, most importantly, being completely height adjustable, with the TEIN set we went for dropping the car from 5 - 50mm! [The set comes with two special spanners and it only takes a minute to raise or lower the damper with the wheel off.]

Fitting:

I had a mechanic from work lined up to fit the OEM shocks, but when it came to the coilovers I found a nice vid on Youtube of two Australian lads fitting them to a Ver.5 STi and it didn't look too hard. Because coilovers come as a complete spring/damper unit there's no need to compress the spring off or on so I decided to have a go myself. I guess Aussie weather preserves metalwork better than in Britain, because those nuts were really on there and it turned out to not exactly be a breeze, but my dad and I did manage to get the rear two on in a couple of afternoons.

The task itself isn't hard provided you have a few spanners and are willing to get your hands dirty, but you need to be prepared to use ingenuity, especially if you live somewhere with a climate like Britain, to get the old shocks off.

PROCEDURE [Rear Shocks Only]:

REMOVAL:

1. Remove the rear seat-squab, seat-back and parcel-shelf by first removing the two screws from the front edge of the rear seat-squab (at the footwell) using a 12mm wrench. Lift the squab and pull it forward out of the way. Remove the three screws at the base of the seat-back using a 12mm wrench, lift it vertically up off the hooks holding it in place and move it clear. Gently pull one side of the parcel-shelf out from under the plastic on the C-pillar and once it is free the shelf should work its way out pretty easily.

2. Remove the two rear seatbelt pulleys by unbolting them from their frames at the base of the C-pillar using a 14mm wrench [though I recommend a socket-set with a few inches reach] and carefully move them out of the way of the suspension turrets.

3. Lift the car and remove the corresponding rear wheel.

4. Slightly loosen the three 12mm nuts holding the top-mount of the shock-absorber to the suspension turret under the rear parcel-shelf so that they can be removed without too much tension later.

5. Remove the brake-hose from the bracket on the shock by turning the collar of the hose and moving it up slightly, which should loosen it enough to pull the thin, flat metal clip out and free the hose. [Our OEM shocks had no U-shaped bracket to slide the hose out of - it was just a closed circle, the hose must have been woven through the shock - so we had to make a cut from the side of the bracket to the hole with a hacksaw and bend it open with
grips to get the hose clear without disconnecting it.]

6. Using a 17mm wrench crack off the two large bolts holding the shock-absorber to the wheel-hub. [Ours were seized on so tight with dirt and crud that we needed a very long bar over the spanner to get enough leverage.] You will then need a second 17mm wrench to hold the nuts in place while undoing the bolts and it may also be necessary to brace it against a heavy part of the axle setup to get a turn on it.

7. Remove the three 12mm nuts from the studs on the top-mount of the shock completely so that only the tension of the spring is holding the shock-absorber in place.

8. Now that that two large bolts holding the base of the shock have been removed, the brake-assembly should tilt forward a little to allow the shock room to move out. The spring will still be holding the base of the shock against its mount but, as there is no weight on it, it should work back out of the mount and down into the gap behind the axle. The top-mount studs should now clear the suspension turret and the shock and spring assembly can be lifted out of the wheel-arch.

ASSEMBLY:

If you're coilovers are fitted with top-mounts right out of the box then go straight to Refitting. If they require you use the car's standard top-mounts [like ours did] then you'll need to get them off the old shock by slowly removing the 19mm nut at the top of the damper-piston - when the nut comes free the spring won't be under enough tension to pop anything off. The piston will begin to turn with the nut, so grip it in a vice if you have space, though strong grips or better still mole-grips will do fine.
Include the top-mounts in the assembly of your coilovers, but don't tighten the nut at the top of the piston completely [the coilovers will have a notch so the piston won't turn with the nut], so that the triangular top-mount can still be rotated to find the turret.

REFITTING:

1. Reverse the lifting out procedure to get the coilover in place with the three top-mount studs mounted in the turret.

2. The coilover shouldn't be under much tension at all with no weight on it and most [including ours] have helper-springs to ease compressing them slightly, so with a little elbow grease it should move into place to get the two large 17mm bolts through to fix the
base of the damper to the hub. [We placed a thinner metal bar through the top hole to help get the coilover aligned, which made it easier to get the lower bolt in first.] Tighten the nuts using two spanners again until the brackets on the damper are clamped tight to the hub-mount.

3. Slide the collar of the brake-hose into the U-shaped bracket on the coilover and insert the flat metal clip beneath it to hold it in place.

4. Replace the three 12mm nuts to the top-mount studs on the suspension-turret below the parcel-shelf.

5. Now the coilover is seated, tighten the large nut on the top of the damper-piston to about 40PSF with a torque-wrench. [We used a lo-tech 'bendy-bar' torque-wrench, but whatever, I'm sure just a good tighten would be fine.]

6. Replace the wheel, parcel-shelf, seat-back and squab.

--------------------------

This was quite an ambitious task to undertake at home - we found ourselves baffled, frustrated and dashing out to buy new tools more than a few times!
Demon Tweeks quoted me £200 to fit all four coilovers and said it would take about 2 hours. With all our figuring-out and store trips we spent a good 10 - 12 hours over two afternoons fitting just the rear pair [although I hope this guide might help one of you to do it quicker than us] - a saving of about £100 - but either way they're on and the suspension is now MOT'able!

Tuesday, 8 June 2010

Steering-Rack Boot Replacement

The O/S steering-rack gaiter, which is a rubber boot that holds grease around the rack, was leaking and this was an MOT failure so before turning to any Subaru garages I shopped around online and got a pair of the boots for £12 from PartsFromJapan.co.uk, who have an amazing selection of the smaller, rarer parts and, with a little help, managed to get the O/S one on in under an hour.

PROCEDURE:

1. Jack the car and get the front wheel off, on the side you're doing the boot on obviously.

2. Take off the front under-tray by removing the two 12mm bolts on the centre cross-member, two 12mm bolts beneath the front lip and the two 10mm screws at the sides.

3. Linked to the hub, just behind the front-edge of the brake-disc is the track-rod end, which runs up into the steering-rack. You can see the rubber-boot over the far end of the track-rod, covering its join to the rack-body. [Mine was split totally in half as you can see below and had seeped grease everywhere.]


4. Using a 17mm open-ended spanner undo the locking-nut holding the track-rod to the hinged mount on the hub. The nut is facing the hub not the rack so if you're facing the brake disc it un-tightens clockwise. The track-rod will likely rotate and move up and down on its bushes so hold further down the rod with strong-grips [or a funny sized spanner if you have one, we got one to fit but its not metric and doesn't have a size printed. I also ended up bracing this against the thick hub-frame to get enough turn on the big spanner to crack the nut.]
Once the locking-nut is turned only slightly, it should allow the track-rod itself to turn freely, anti-clockwise, out of the hub-mount.


5. Open the finger-clip holding the near end of the rubber-boot and slide it off the rod. Undo and dispose of the clip or tie holding the large end of the rubber-boot on to the rack body. Cut open the rubber-boot and slide it down off the track-rod. [Mine had been split, and the rack exposed, for quite some time so I cleaned off all the dirt and grease I could with a rag - thankfully no gravel has got into the steering!]

6. Re-grease the rack and smear a few blobs of grease around the inside of the new rubber-boot. [We used Castrol LM Grease we had lying around. I'm not sure what Subaru suggest, but any thick engine grease will do.]

7. Slide the new boot over the track-rod end, working the narrow part over the locking-nut, and up into position. Replace the clip/tie from the large boot end with a cable-tie, then slide the finger-clip back down the rod and re-fasten it. Screw the track-rod back into its mount and tighten the locking-nut hard anti-clockwise. Replace the wheel and front under-tray.

This is a relatively simple job, done in an hour with just a few spanners and would no doubt cost plenty at a garage, let alone one of the 'Subaru' ones!

Sunday, 6 June 2010

MOT Update - 2 weeks to go!

The test looms near and wow there's a lot going on in Scoob world! - I've spent over £1000!!

Got about a fortnight to go now until the current MOT runs out, however I'll have to get the car back into Seaview Motors by next Friday (11 June) to qualify for a partial re-test, where they only check what the car failed on [and any other faults that have arisen this week will be ignored!]

Just over a week and I've sorted all but the few mechanical problems.
Heres the checklist so far :

1. N/S Headlamp Aim - The 98 model Scoob features electronic headlamp-leveling [for when you're towing a caravan] so the beam for my O/S headlamp can be raised with the flick of a switch. The N/S one is off a 94 Scoob though, with no fancy leveling and simply had to be raised the old-school way by shining the lights onto our garage door and adjusting the beam up manually with the ratchet behind the light-lens.

2. Number Plate Lights - Luckily the 'broken' one only needed a new bulb, the socket was just hiding away in the bumper so I replaced both bulbs with 'Heavy-Duty' 12v-5w mini-bulbs @ £3.99 from Halfords. The other socket had worked its way free of its mount so I just screwed it back up with a 10mm long self-tapper. Simples.

3. Foglamp Not Working - This got fiddly! We took the bulb out, which looked blackened so we chucked in a replacement to find this wouldn't work either. After much deliberation over whether the switch or wiring may be broken we reached for the Multimeter... I first downloaded some wiring diagrams for the rear lights and as my dad and I got our heads around them we discovered that the two wires that run to the Subaru fog-lamp were not connected to anything on the new twin-clusters. I chopped the wires from the fog-lamp on the new clusters and fed them directly through the connector and into the two terminals that had previously been blank. Hey presto! Instant fog-lamp! Its a great feeling to know I've finally given the car a fog-lamp it never had before, but weird how she sailed through her last 2 MOTs with these lights on - no mention of the friggin non-existent lamp! Dodgy!

4. ABS Warning Light On - I downloaded a "Diagnosis Checklist" for the ABS warning light - a whole 50 pages by itself!! We grabbed the multi-meter and managed to work through the major components [PCM control-module, power circuit, etc.] with no results. I've deduced it is probably one of the tiny ABS-sensors on the wheels, which are nigh-on impossible to replace, so for now I decided to just take the bulb out of the warning-light in the dash. Had to take the whole dash apart to get the gauge-binnacle out, but all in all the job took less than an hour.

5. O/S Steering Rack Boot Split - Found the part on a great site called JapaneseMotorSpares.co.uk, who have a superb stock of all those niggly, hard-to-find import parts. A pair of the boots cost £12 delivered and arrived the next day, absolute bargain, so I will have to get around to fitting the other one seeing as I have a spare. We got the boot on very easily in about 1 hour - I'll cover it in a post soon as.

6. N/S Rear Shock Absorber Leaking - I went a bit mad here. A pair of OEM [Kayaba Racing] rear shocks was the obvious direct replacement and cheap as chips @ £115 - but I didn't buy those. Instead I plumped for an entire adjustable coilover kit from JDM badboys Tein, which was a bit pricey @ £655, but you get what you pay for - these are the real deal!! Me and dad fitted the rear two on Sunday, but its a complete kit so the front ones will have to go on soon. Watch out for the post!

7. Emissions and Noise Excessive - This was the real problem-child. Quik-Fit, National, even large local stores like Chester Exhausts don't exactly shift many of these standard systems, so the cheapest price quote I could get for a full system, fitted while I sip coffee was £819. Ouch. The next option was to buy the OEM system separately and fit it myself. All I could find new was a real budget model 1st and 2nd cat @ £240 together, but still a rear pipe would be extra.
Scoobynet chums suggested I just shell out for a sports-cat for about £250 and have done with it, which will pass the MOT while hardly decreasing the power or noise. This originally seemed expensive to me, but after the OEM shit I guess not only is it the best value-for-money, but actually the cheapest option too lol. I tracked down a nice Prodrive 100cpi sports-cat that should fit straight onto my Peco centre-section... I hope, and its a bit below the average @ £235 delivered, although it is a used item - off a V4 STi Prodrive to be exact :) Hopefully this will get us through the test - I will have to hope it kills the noise a little bit or I'll have to buy a bung...

The deadline is Friday and the Prodrive cat still hasn't arrived so fingers crossed!
 
ScoobyLab + Propjam 2010/11