<-CLICK HERE FOR SCOOBY TECH. POSTS ONLY! CLICK HERE FOR GRAN TURISMO POSTS ONLY!->
1998 Impreza Turbo Project Car + Expanding WRX Knowledge Base!

Monday 31 May 2010

Prodrive Seat Emblems!


The seats are all in good-nick and that deserves celebrating so I thought I'd spruce them up with some emblems to make them look like the embroidered Prodrive ones.


The emblems cost just £12 from eBay from a guy called Movi-Star - bargain. The grey Prodrive writing is made of a thick, rough suede-like felt and the blue strip is a very nice smooth alcantara type felt so they look and feel like they came on the seats, not like a cheap add-on and from outside the car of course, there's no way of telling them from an embroidered original ;)

The emblems are very easy to iron on, provided you have the right heat setting. They recommend you start on a very low heat and work up so you don't burn the seat, but the transfers won't stick at all unless the iron is pretty darn hot. It took me a good hour of working up the heat for fear of damaging the fabric, but these Subaru seats are tough stuff and in the end I had the iron almost on full heat to finally make the transfers stick, with no burning of the seats at all. Nicely nice!

[To look like the seats in the Prodrive Turbos that is, not the P1 style seats - I saw a pair of those beauties for £300 on eBay, but they're blue and have P1 embroidered, wouldn't suit. Besides, if you wanna talk whole new seats then its got to be Bride 'Holding Monster' all the way (http://www.brideseats.co.uk) - they are the Recaro of the JDM world, shame a pair costs a grand and up!!]

Sunday 30 May 2010

Engine Cleaning + Dressing - Part I


I've wanted to bling up the engine bay since the day I brought the car home and finally got prompted to this afternoon as I fixed the under-cladding on the bonnet. It was now hanging by a thread and I don't want to chuck it so decided to stick it back up with some aluminum tape. This is great stuff that can be moulded to the underside of the bonnet and its heat-resistant so it won't come loose sat next to the engine.
I started by cleaning the dirt and grease away from a small patch for the tape to stick to, but soon got carried away and ended up polishing the entire underside of the bonnet. I wiped the whole area down with a damp towel, getting rid of the surface dirt but leaving large oily swirls, so I used a mixture of Carb Cleaner and WD40 to cut the grease and get it shiny. Its now a million miles from the tatty mess it was this morning... though it'll shitty up again before you can blink!

The aluminum-tape also served another useful purpose in properly fixing the grille in place - I ran a strip of it along the back of the grille holding it to the slam panel.
The actual reason I chose this rather than screwing through the broken clips is because I've seen a 'Cooling Panel' from GReddy that bridges this same gap behind the grille.
It's made of carbon-fibre and will set you back £145 from Flat4Online.co.uk! [here if you don't believe me] In their words this "increases the amount of air going through the radiator leading to cooler engine temperatures". I'd argue that mine is even better at doing that and cost sweet FA! [tape filched from work of course] The shiny tape also looks cool so while I was at it I smothered the flaking V-belt cover too! [eat your heart out SpecR XD]

Anyway, what good is all this on a grubby engine? I now began the laborious task of cleaning the mechanical stuff [deeper than I have before] and am impressed with the results!


I first removed all the dirt filler-caps and gave them to my dad, who very kindly bathed them in white-spirit and painstakingly brushed the grease from the detailing - they're now reflecting the flash!
I then used more turps to clean the crud off every pipe, hose, wire and lead, as well as the cam-cover, radiator, intercooler, everything... I then rubbed tyre-dressing into all of the black rubber-hoses to get them looking a bit fresher.

As a finishing touch I took the dump-valve off for a polish, but most importantly to turn it round so the Bailey logo is facing out!
Very surprising that the Demon Tweeks mechanic would fit it like that - unprofessional I think, because any person shallow enough to buy a loud, hissing dump-valve would want to see the logo!


Saturday 29 May 2010

Pre-MOT : The Verdict.

The current MOT runs until the 22nd of June, but after being told by the dudes in National Tyres the other week that my rear-shocks were kaput, I decided to get the car in as soon as possible and find out what the damage really is.

The last MOT was done at Seaview Motors in Liscard, Wirral and as Village Motors in Wallasy [where I stupidly kept taking my BMW] are the most knit-picking test-centre in the world, I thought it couldnt hurt to give Seaview a try if they know the car.

The test cost £45 quid, which is a whole £20 more expensive than Village Motors, but if I'd taken the car there I then it would be for sale right now...

Here's a scan of the test-sheet itself. Im amazed it didn't fail on anything more serious!


What I'm most surprised at is that the brakes came home A-ok - the discs at the back are pretty worn! The bane of my life with the BMW was rubber-bushes all over the place - only pennies to buy, but an absolute bastard to fit. Subaru obviously know this then and fit superb ones to their chariots! [unless I was just right to trust Seaview garage to be lenient... ;)]

Ok so a few things on there, but it's not the end of the world. here are my intentions:

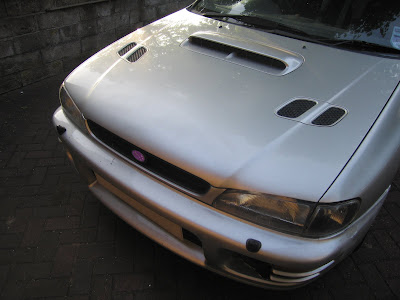
1. Headlamp - It's off a MY94 Scoob so it doesn't fit the grille right and this pushes it down to aim for the floor. I had to cut a slice out of the grille to fit it this far... so more will have to go if need be to tilt it up.

2. Number Plate Lights - Pennies to replace the bulb and a bit of glue to stick it back in place - done.

3. Rear Foglamp - Someone hasn't fitted the twin light clusters at the rear properly, leaving off the wires to the fog and reverse lights. Should be an easy fix when I find the wiring diagrams.

4. ABS Warning Light - This is a tricky one. There are 65 pages in my workshop-manual devoted to diagnosing problems with the ABS light. I'll be checking all the basic components with a circuit-tester and the mechs at work can run a diagnostic machine on her, but the tiny brake-sensors are very hard to replace, so if thats the case I might just cut the wire to the warning light.

5. Steering-Rack Gaiter - A rubber sleeve that holds grease round the steering-rack has split. £10-20 for a new one and its a doddle to fit, provided nothing has seized.

6. N/S Rear Shock - Was well chuffed when only one of the shocks failed after the National guys said both were wrecked - best to replace both though anyway! A replacement OEM pair [Kayaba Racing] is a snip @ £115 for the pair from camskill.co.uk. What I really want though is a full set of coil-overs for the car - and it has to be Japanese. I fancy a set of the TEIN Super Sport kits, usually costing a grand, which are going for £650 on eBay - I could just afford to take this giant leap so fingers crossed.

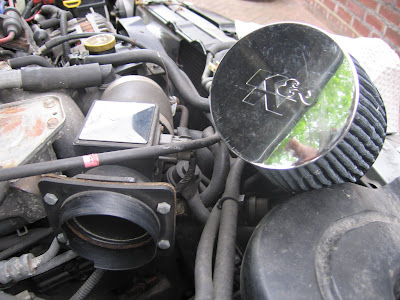
* 7. Emissions and Noise - The exhaust is the only bit that baffles me [no pun intended!]. I can fit a bung to make it quiet, but emissions is a different story. I'd suspected the CAT had been removed and wasn't surprised to hear it would need to be put back on for the MOT. I can slap on a brand new budget unit [down-pipe, CAT, front-pipe] for £120 from a great site called Cats-Direct so no worries there, but now the problems begin. Will the OEM front-pipe fit onto the 3" custom centre-section? It can be adapted to fit as long as its the right length to meet the join but, even with the CAT on, the custom straight-thru centre-pipe and back-box might still fail the emissions test.
So will I have to splash out on a full standard exhaust-system? Guaranteed pass and my fuel economy will certainly improve no end! The car would also be peppier at low revs and the engine idle more nicely and generally be more sedate. Lets not forget that I'll be dropping about 20bhp though! And what can I do with my beautiful 3" s/s turbo-back system? Bin it?

Decisions, decisions... I've been preparing to spend some money for the MOT for a while now so lets wait and see.


Monday 24 May 2010

Re-Inventing the Wheel.... Arch - Part I

Time to get to grips with the daddy dent - the o/s rear wheel-arch. Seems like someone really scraped the gatepost...


This is the most ambitious part of the bodywork I have attempted so far, but the process was just an advance on the bonnet-lip fix.

PROCESS:
I first removed the rubber beading from arch, which peels off pretty easy, and sanded round the entire damaged area, down to the bare metal in most places, particularly on the small rust patches. The rust was only very slight to be fair, but still took some sanding off to get to clean metal, which is essential to stop the rust from coming back underneath the paint. The arch was pushed in more than it seemed and the corner where it meets the bumper had kicked out slightly so we lightly pulled the arch-lip out by hand, then fine shaped it and knoc
ked the bump in with a ball-hammer.


I then covered the whole area in a nice thick layer of P38 filler [which was drying in the sun so fast it took about 10 mixes] and began to smooth the area down, trying to blend the filled dents into the line of the wing. Filling in the dents was easy enough, but as I sanded down each layer in contour with the body the filled patch got smaller and out of shape with the rim of the wheel-arch, so it took a few mixes to build the area out to match the arch line and flow into the body.


I held a straight-edge across the arch to check I'd filled out to match the other side of the car and when I was satisfied I sprayed the area with a quick coat of primer to get a better idea of the shape. The lip of the arch was wide enough, but the primer revealed it would need building out a bit more to be able to recreate the flat side of the arch lip. I repeated the process and built the lip of arch out a bit more in order to sand it flat for about 1cm before it curves off into the body.


Got the flat section looking pretty good, but still needs a little filling out before I get round to painting it. That may be some time as its back to work I go!


Sunday 23 May 2010

Painting the Bonnet-Lip

Had a few days off this week and got serious with the bodywork, starting by painting up those primed bits on the bonnet. Thought I should buy everything I'd need to do a professional(ish) job, so I grabbed a can of Clear Lacquer and some Rubbing Compound from Halfords [each £5.99], bringing the total cost of the bodywork to £36, but worthwhile for the quality of the finish!


Not a bad job!

PROCESS: I marked out an area on the bonnet-lip around most of the stone chips and sanded the paint completely down to the grey Subaru primer. I then began to spray on lots of very light coats of paint to avoid drips and run-marks - each coat dries in 5 mins. if it's a reasonably warm day. The contours of the sanded areas start to show up though after a few coats and I think the paint bunches up around the edges so I gave it a light rub down with very wet 600/1500 grit Wet/Dry paper every few coats to stop the paint ridging. After a lot of rubbing down and spraying [well, it is my first try], I got the lip covered and more-or-less blended with the rest of the bonnet.
I left the paint to dry overnight and then began rubbing it down with the super-fine 1500 grit Wet/Dry paper, soaked in plenty of water. As well as to clean the paint surface, rubbing it like this is required to create a smooth matt-finish for the lacquer to coat it properly. [which I would never have guessed as the paint match looks so good anyway.] I then started to spray the lacquer on, coat after coat, until I'd used about half the can!
To finish I'll need to use the Rubbing Compound [a bit like T-Cut] to smooth the lacquer down to match the rest of the bonnet and give the seamless finish I'm after, but it'll have to wait - the lacquer-can recommends waiting 2 weeks first!

Either way it's given the bonnet the much needed facelift! [along with properly fastening the grill, which I'll cover later in a bit about engine-dressing] The peppered lip and those 3 giant nostrils are history!


Saturday 22 May 2010

Custom Boost-Gauge Proposal

I always knew I'd want a boost-gauge when I got a turbo car, so I've priced up some nice JDM ones on eBay - I've always been fond of the APEXi EL range (blue-glow) dials, costing over £120 new and going for about £50 used online. The OEM gauge, fitted to STi/Type-R Scoobs, is actually a GReddy piece and is styled to match my white Subaru dials and labels. Hard to find new, but there is a nice used one on eBay at the moment, complete with the vacuum-tube, T-piece and bracket to fit my car @ £60 - ultra tempting!

I just can't see anywhere to mount it though so I've had to consider my options...

Bracket: I can mount the gauge anywhere in front of me, but the vacuum-tube and backlight wires would be exposed and drop through holes drilled into the dash, which would be messy and the lone dial sticking up would look out of place anyway.

A-Pillar Pod: This makes the gauge install far too substantial and I can't see myself putting in any more expensive gauges so no point. Besides, these are so unbelievably cliched in car-world, [I've seen someone with pods on both A-pillars of a standard car and not a single gauge between them] that I couldn't stoop so low!

Centre-Panel Cluster: The full rally effort, but this means doing away with the cubby-hole lid and losing the storage space and, again, I won't be buying another two gauges to fill the pod.

I guess the bracket is my only option unless I get serious and do a custom install into the dash. I've seen this done on plenty of early 93-96 Imprezas, [in the ash-tray spot and on the top of the centre-panel] but my 98 dashboard is just too cluttered with extras and compact for storage. People have suggested losing one of the middle heater-vents and making a flat panel - easy, but with British winters I don't think so...

This is the solution I've come up with, although it's a bit on the ambitious side... Sink the gauge into one side of the cubby-hole on top of the dash so the tube and wires are hidden away and cut a recess into the lid of the cubby-hole to show the dial-face through. The dial would have to sit proud of the lid to be seen, but it's only a 60mm gauge so not by a great deal and, most importantly the lid can still open to use the cubby-hole, and inspect the gauge if I need to. To be extra tidy I could build a cowl over the gauge and smooth it into the lid with body-filler. This would look absolutely siiick and cost pennies to do, but I can't match the textured-surface of the lid so maybe cover the whole the whole lid in a sheet of real carbon-fibre @ about £25... :)

I've made some rather crude virtual images of how it might look soon, perhaps:

Tuesday 18 May 2010

Cleaning up the Roof-Scoop mess!

Whoever glued the aftermarket roof-scoop on used not epoxy resin, but silicone bathroom-sealant so, unsurprisingly, Trevor who I bought the car from said it flew off on the motorway during his reign.

This left a horrible horseshoe of dirty silicone where the scoop had been bonded and I thought it was high time to get rid of it.


I used tar-remover to soften the sealant [just xylene paint-thinner basically] and gently shaved it away with a square-cut razor blade. [not a Stanley-knife blade!] I then used a kitchen-scourer and more tar-remover to get the fine bits off. This left patches of light scratches and discoloured paint so I finished by rubbing in a load of T-Cut, which has made the horseshoe shaped patch barely visible close up and restored the silver.


At first I thought the paint would crack off before the sealant did so I was surprised when I got it sorted so quick. Still needs a bit more T-Cut and elbow grease, but either way what an improvement!

Friday 14 May 2010

Carpeting the Boot Install

Got round to carpeting the plywood install in the boot at last with some nice grey acoustic cloth, filched from the skip at work.

I just placed each plywood section onto a piece of the cloth, folded about 3 inches round the back and tacked it down every 4 or so inches along. For the curves and fiddly bits I cut the fabric edge into strips at the corner apexes and at points along the curves, which may not be the professional way, but certainly recreates the shape of the wood well and looks great!

I would recommend sticking the carpet down with spray-glue before tacking the backside, but I didn't bother. As the plywood is so thin, nails and carpet-tacks we're no good, so I used drawing pins, which are the perfect length. This also keeps things cheap and incurs the first cost of the entire install @ £1 for 3 boxes :) - quite amateur looking though, at least they're hidden away.


This has really made the boot look complete and useable! Just a few more finishing touches - a storage area on the right hand side and neatening up the jack compartment on the left side - and it's done.

NB: I have now weighed each part of the install, including the amp and sub-box, and the total comes to 32kg - about 5 stone! - in other words the weight of a small passenger...

Sunday 9 May 2010

Cleaning the Air Filter

I wouldn't say the engine was suffering too much, but the K&N filter has always looked a bit gunged up so I decided to whip it off and service it, just to tick one more little bit of maintenance off the list.

I unbolted the cone at the jubilee-clip and laid it sideways in a shallow bath of petrol, rotating it every 10 mins. until the entire filter was soaked and the petrol had turned a thick, murky black. I left the cone to dry out and finally stippled three caps of oil over the filter-spines with an old paintbrush. [K&N recommend their own special 'filter-oil' , but my guess is that any light-oil will do just fine, so we used a nice, thin 0-40W engine-oil, sue me.]


As you can see in the pic, the plastic mounting-plate for the cone has cracked all down the left side of the mouth and it took ages to find a suitable angle for the jubilee-clip to hold the cone on tight, but only just. The cold-air feed in the bottom-right of the pic turns away from the air-box and does a 180° turn inside the wing before coming back to the filter. This extra duct is pointless so I'm going to make it much more direct soon.

I'll have to see about replacing the cracked mounting plate, but while I'm at it I might do away with the cliched 57i cone and stick on something more fitting - a HKS Super Power Flow mushroom [http://www.hkseurope.com/intake/spf_reloaded.asp] if I can find a used one cheap enough on eBay, but if I'm spending over £100 just on an air- filter then I'm going BMC carbon-dynamic all the way [http://www.bmcairfilters.com/infoCDA.asp].

Saturday 8 May 2010

Minor Front-Bumper Improvement

What better way to test the special-mix paint for a match than by painting the ugly patched spot on the front bumper corner. All ready to paint.


Definately an improvement and the paint is a good match, but the spraying leaves a bit to be desired - at least it doesn't look so shabby now at glance. Still I will need to rub the area down again with Wet/Dry paper and re-paint it when I have a minute and try and get some of that overspray off the lights/grilles -.- .

I could really do with sanding some of the bumps out of the filler at the top of the bumper. I got a mint condition black bumper also with the car, so before I get too serious about repairing the current one I will have to consider just getting the nice one sprayed silver professionally and fitting that instead...

Engine Mod List [+ Wishlist!]

I've never really had the inclination to fit performance enhancing parts, being far too worried about the condition of my past engines and concerned about emissions/economy, however practicality is not a big concern when driving an Impreza Turbo! Whacking on power-parts is also par for the course with these motors and, like 99% of similar Scoobs, it has been tweaked a tad...

Existing performance mods :

K&N 57i cone induction-kit. [as this is the cornerstone of any engine bay, I'd love to get something more Japanese looking in the near future]

Bailey EVO dump-valve with Samco blue hose kit. [no pips or chirps here, this is an old skool hisser]

Peco custom-built 3.5" cat-back exhaust system with 4" tailpipe. [custom-built onto the car at Peco HQ in Birkenhead]


This leaves me wondering what to throw on next... it could certainly do with some sort of remap to deal with all the extra air coming and going!

Maybe even new camshafts to give me a much needed burst of torque at low revs...

STi top-mount intercooler?? Or even a bolt-on front-mount kit...

I assume the old spark-plugs have seen better days so I will look into throwing on some NGK Platinum ones @ about £30, or if Im feeling flush some HKS S-series racing-plugs @ £75! :)

Friday 7 May 2010

Starting the Bodywork - Bonnet Chips

Now the weather is nicer it's time to begin the body bits. There's a few nasties to get out the way - 2 deep scratches on the back bumper, the front bumper corner, a few paint bubbles round one wheel-arch and finally the massive scrape on the rear wheel-arch, but I'm going to start easy with those 3 ugly, deep stone chips on the lip of the bonnet.

The 3 big chips were a bit too deep for touching-up and painting so I bought a tube of P38 body-filler (£5.99) and some 600grit Wet/Dry fine sandpaper (2.49) to make a nice go of the entire front bonnet lip, which is also dotted with smaller chips, and repainting it in one go with my special-mix Light Silver 406 spray (£12.99), all from Halfords.

I used a small strip of mid-coarse sandpaper to rub down about 1cm around the deep chips. The body-filler guide recommends rubbing it to the bare metal, but the Subaru primer is so good I decided not to go through it completely and the P38 sticks to it just fine. I mixed a small amount of P38 and spread a thin layer over the entire sanded areas, leaving as little excess as possible. I then rubbed over the filled areas with the mid-coarse paper until I was reaching through to the paint again, then switched to the Wet/Dry paper, which creates ultra-fine dust that shows up the tiny blemishes in the filler very well. It also leaves a super smooth surface and after a fair bit of rubbing away I got the filled area down to just around the chip and level with the surrounding paint.


As a final test to check for flaws in the filler I masked a small patch around a filled area and sprayed on a quick coat of zinc-primer. I finally soaked some Wet/Dry paper in warm water for 10 mins and rubbed down the entire sprayed area until it began to reach the surrounding silver paint, leaving an ultra-smooth finish.

My only remaining task is to rub down the entire finished bonnet lip at once, until it is just reaching the primer, to prepare it for the silver repaint. I have no idea how the new paint will blend into the rest of the bonnet so we'll have to wait and see...

Got some good practice with filling and sanding that's made me feel more confident about attempting to reshape the gouge in the rear wheel-arch!

Scooby Tunnel Run - May 2nd

I found a flyer for the '09 Scooby tunnel runs from Liverpool to New Brighton on Wirral in my glovebox and after a bit of searching I found a gang on Scoobynet who were planning this year's runs. I've been on a run every month since I bought the car. Here are some shots from this months run.

It was very well organised this month with a bloke called Lee in a silver Hawkeye literally blocking lanes and stopping traffic so we could all roll together. The tunnel was closed down to one lane thought, which limited play, so by the time we got to New Brighton it was chaos as we all raced up the front.


Thursday 6 May 2010

Replacing the Fuel Filler-Pipe

There was always a strong smell of petrol at the back of the car, which I put down to the exhaust system, and the petrol gauge worked very poorly, barely moving upwards with £20 in the tank. After a couple of weeks I noticed a giant pool of petrol under the car while filling up and was relieved to find it was only leaking from the feed pipe to the tank while filling up and not the tank itself. It figures, seeing as the bare steel pipe itself passes straight through the open rear wheel-arch!

I got a quote of around £200! from my nearest Scoob service-centre to fit a new pipe so I turned to the forums and found many people quoting similar figures of £180 and £190 even without fitting! eBay was a different story, with used filler-pipes going for as little as £30 in poor condition to £60+ for one as-new. I went for the latter, with a mint example off a Jap WRX @ £58 delivered. The import part differs only from my UK original in having no nozzle adaptor for our fuel-station pumps or inner-flap - it's just an open pipe to the tank.

I wonder how long before the new pipe goes like the original, which was in a sorry state as you can see below. As well as the U-bend leaking petrol, the nozzle had rotted away so much that daylight could be seen through it looking up through the wheel-arch. I take it the problem had been around for some time too - over the years it's been fixed with a welded metal plate, metal body-filler, a rubber-tourniquet, about six different types of tape and pasted in red Hammerite - all without fixing the leak!


The fitting was really not a difficult job, provided you have basic home-garage tools. Apart from a few time consuming snags we were able to get the new pipe on in about 2 hours, making it well worth the money saving!

I couldn't find a how-to-guide for this job online, so I have written this one for Scoobynet:

* The filler-pipe and fitting procedure are exactly the same for ALL models of classic Impreza from 1993-2000. *
REMOVAL:

1. Lift the car and remove the driver's-side rear wheel. [I used a trolley jack and put an axle stand under the trailing arm.] You can see the filler-pipe exposed in the wheel-arch where it passes through the body and snakes down to the fuel tank.


2. Remove the plastic protector from around the filler-pipe by first removing the one or two screws holding it in place using a 10mm wrench. [Subaru provide suitable spanners with the car's toolkit, but some of the screws and clips are quite hard to get to without a socket-set with some reach.]

3. Open the fuel-flap and remove the fuel filler-cap. Remove the three 4mm crosshead screws holding the nozzle of the filler-pipe in place, shown below. [Mine we're seized on so tight that I eventually stripped the screw-heads and had to drill them out. These little screws are made of some remarkably hard steel and I ruined several HSS drill-bits while barely cutting the screws. In the end I bought a HSS-CO bit for £8.99 from my local B&Q, which did the job with plenty of oil - so make sure these screws can be removed before disconnecting anything else!]


4. Squeeze open the finger clip at the top of the vent pipe and slide it down out of the way. Slide and twist the rubber vent hose down off the filler-pipe vent. [Or if it is too badly corroded as mine was, it may be necessary to remove the rubber-pipe from the vent-pipe on the chassis first and retrieve the rubber-hose once the filler-pipe has been removed.]

5. Underneath the car, just as the filler-pipe passes under the rigid cross-member, you should see the start of the rubber-hose connecting it to the fuel tank and the jubilee-clip. Loosen the jubilee-clip using a 10mm wrench and slide it down onto the filler-pipe. Press the edges of the rubber-hose to loosen its seal before the filler-pipe is unfixed. [It is difficult to loosen the jubilee-clip without a socket-set with about 10cm reach. The jubilee-clip is also hard to keep in place when it starts to open, but its awkward to get two hands into the gap and you may need someone else to reach in through the wheel-arch to grip it.]

6. Remove the one or two screws that hold the filler-pipe onto the chassis using a 10mm wrench. The filler-pipe should now be free to move around and held in place only by the rubber-hose joining it to the fuel tank. [Mine only had one screw and the head sheered off so was forced to drill out a new hole in the bracket and insert a 4mm nut and bolt.]

7. Slide the filler-pipe out of the rubber-hose now that the pipe is free to rotate. The pipe’s U-bend retains a cupful of petrol so hold a container below the lower spout to tip the contents into. Lower the filler-pipe until the nozzle is free from the chassis and the filler-pipe can be removed through the wheel-arch.


REFITTING:

Reverse the removal procedure to fit the new filler-pipe.

It is unnecessary to replace the black plastic that surrounds the nozzle of the filler-pipe, although most second-hand pipes I've seen come with one. It contains the opening mechanism for the fuel-flap and a drain-pipe that are both inside the bodywork and very tough to get to so it’s not worth bothering, although it might be worth replacing the steel mounting-plate within the plastic-surround if you get a new one with the pipe.


The new pipe was bare metal, probably good for the remaining life of the car, but I sprayed it with a quick coat of zinc-primer anyway before fitting and rubbed some copper-grease over the main rot point on the base of the U-bend.

I also replaced the three 4mm screws I drilled out from the filler-pipe nozzle with some much milder steel ones, bought for 50p from a small hardware store.

 
ScoobyLab + Propjam 2010/11